If you’re a plant lover looking to add some vibrant beauty to your home or garden, amaryllis seeds are a fantastic option! These seeds hold the potential to grow into stunning flowers with large, showy blooms that are sure to command attention. Whether you’re a seasoned gardener or just starting out, this blog post will provide you with all the information you need to successfully grow amaryllis from seeds. From pollination to propagation, we’ll cover it all. Plus, we’ll address common questions like when to plant the seeds and how long it takes for them to sprout. So let’s dive in and discover the wonders of amaryllis seeds together!
Amaryllis Seeds: Growing Tips for Beautiful Blooms
If you’re a gardening enthusiast looking to add a vibrant touch to your indoor or outdoor space, look no further than amaryllis seeds. These little bundles of potential can bring life and color to any corner of your garden. But what do you need to know to successfully grow these beauties from scratch? We’ve got you covered with some easy-to-follow tips.
Patience is a Virtue
Before we dive into the nitty-gritty of growing amaryllis seeds, let’s address the elephant in the room: patience. Growing amaryllis from seeds takes time, my friend. It’s not an overnight miracle. So, channel your inner Zen master and prepare yourself for a journey that will test the limits of your horticultural patience (but trust us, it’ll be worth it!).
The Quest for the Perfect Environment
Amaryllis seeds are picky little fellas when it comes to their environment. They crave warm and cozy surroundings, like a tropical holiday destination for plants. So, make sure to give them the VIP treatment they deserve. Choose a spot that gets plenty of sunlight throughout the day, but avoid exposing them to scorching heat. You don’t want to fry their delicate little souls, do you?
Feeding Your Seeds

Now, let’s talk about food. We all need it to thrive, and amaryllis seeds are no exception. To give them the nourishment they need, prepare a well-draining potting mix with a good balance of nutrients. Think of it as a delicious buffet for your seeds, complete with the works – organic matter, perlite, and maybe even a hint of worm castings if you’re feeling fancy. Bon appétit, little seeds!
The Art of Planting
When it comes to planting amaryllis seeds, there’s a delicate art to it. Start by filling a small pot with your carefully crafted potting mix, leaving about an inch of space at the top. Gently place your seeds on the soil, giving them enough room to spread their roots and grow into glorious beings. Cover them with a thin layer of soil, like tucking them in for a cozy nap. You’ll be their gardener and their Sandman all in one!
A Toast to Watering
Time to hydrate those thirsty little seeds! After planting, give them a good drink of water, but be careful not to drown them. Remember, we’re looking for a cozy tropical vibe, not a soggy mess. Keep the soil moist but not soaked, like the perfect sponge cake. Now, repeat after me: “I solemnly swear not to overwater my amaryllis seeds.” Good. Now let’s move on to the next step.
Care and TLC
Congratulations, you’re officially an amaryllis parent! But the journey doesn’t end here. Your seeds will need some tender loving care along the way. Keep an eye on their moisture levels, making sure the soil doesn’t dry out completely. Protect them from extreme temperature fluctuations that could send them into shock. And just like you enjoy a good dose of sunshine, so do your amaryllis seeds. Give them plenty of light, and they’ll reward you with their majestic presence.
The Grand Finale: Blooming Beauties
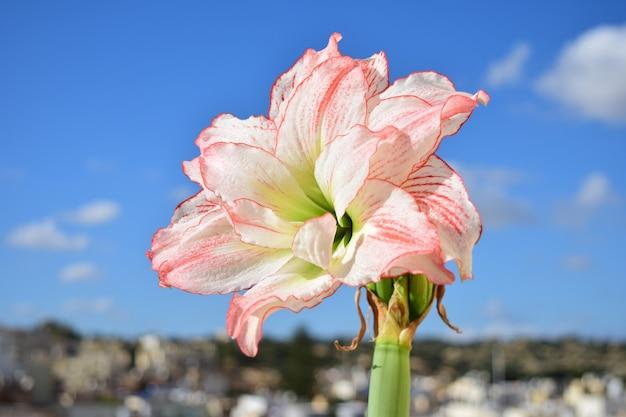
And now, the moment we’ve all been waiting for – the blooming spectacle of your amaryllis seeds. It may take some time for them to reach this stage, but trust us, it’s a sight worth waiting for. As their leaves turn green and grow taller, and their stalks shoot up to the sky like rocket ships, you’ll know the show is about to begin. And when those vibrant blossoms burst open, filling the air with their enchanting fragrance, you’ll be the proud parent of Mother Nature’s very own masterpiece.
Growing amaryllis seeds isn’t for the faint of heart, but with a little patience, love, and commitment, you can witness the beauty of nature unfold right in front of your eyes. So, roll up your sleeves, channel your inner green thumb, and let the journey begin. Happy growing, my fellow horticulturists!
Amaryllis Man: Unleashing the Legends and Lore
The fabulous amaryllis plant has captivated gardeners around the world for centuries, but have you ever wondered about the fascinating characters behind this floral sensation? Enter the world of the Amaryllis Man, where legends and lore intertwine with petals and pistils.
Meet the Amaryllis Man
Legend has it that the Amaryllis Man is a mysterious figure who roams the countryside, disguised as an ordinary gardener. Armed with a green thumb and a twinkle in his eye, this botanical hero possesses an uncanny ability to coax magnificent blooms out of the amaryllis seeds. Some even say he has a secret potion that makes the roots grow so deep, the flowers bloom taller than a basketball player!
The Man of Many Faces
Unsurprisingly, the Amaryllis Man goes by many names – the Floricultural Phantom, the Bulb Whisperer, and the Petal Pusher, just to name a few. Regardless of what you call him, one thing’s for certain – he’s a force to be reckoned with when it comes to nurturing amaryllis plants.
Unveiling the Secrets
So, what’s the secret behind the Amaryllis Man’s remarkable success? It’s said that his knowledge of soil composition is second to none. He knows that amaryllis seeds prefer loose, well-draining soil, with just the right amount of organic matter to keep them happy. But that’s not all – the Amaryllis Man has a sixth sense for temperature and light, ensuring his plants thrive in the perfect environment.
Cultivating the Myth
Rumor has it that the Amaryllis Man possesses a magical touch that turns a dull garden into a vibrant sea of colorful blossoms. Some even claim that if you listen closely on a quiet night, you can hear him softly humming Bach’s “Brandenburg Concerto” as he tends to his amaryllis beds. Is he a guardian angel of gardeners? Or simply a figment of horticultural folklore? The answer remains shrouded in a cloud of mystery.
Embrace the Amaryllis Man Within
In truth, we are all capable of channeling our inner Amaryllis Man or Woman. With a little bit of love and care, anyone can grow amaryllis plants that elicit “oohs” and “aahs” from friends and neighbors. So next time you’re tiptoeing through your garden, take a moment to imagine yourself as the enchanting Amaryllis Man, cultivating the beauty that nature has to offer.
Amaryllis Mantras to Live By:
- Love thy soil: Treat your amaryllis seeds to well-draining soil, and they’ll reward you with glorious blooms.
- Temperature matters: Keep your amaryllis plants cozy, but not too hot or cold. They’re a bit like Goldilocks – they prefer it just right.
- Light up their world: Provide your amaryllis plants with plenty of bright, indirect light. They’ll soak it up like a warm, sunny vacation.
Now, armed with the legends and lore surrounding the Amaryllis Man, you can grow your own collection of amaryllis with confidence and a dash of whimsy. So go forth, my fellow gardeners, and let the magic of the Amaryllis Man inspire you to create blooming masterpieces in your backyard. The world needs more botanical heroes, after all!
Amaryllis Seeds for Sale
If you’re on the lookout for amaryllis seeds, you’ve come to the right place! Finding these elusive little gems can sometimes feel like searching for a needle in a haystack, but fear not, friend! We’ve got the inside scoop on where you can find amaryllis seeds for sale.
Local Garden Centers
There’s nothing quite like the joy of perusing your local garden center, surrounded by lush greenery and the sweet smell of flowers in bloom. Many garden centers carry a variety of seeds, including amaryllis seeds. So put on your gardening gloves and head on over to see if you can find these magical seeds for yourself!
Online Retailers
In this digital age, practically everything is just a click away, and amaryllis seeds are no exception. There are plenty of online retailers that specialize in seeds and plants, making it easier than ever to get your hands on some amaryllis goodness. Just be sure to read reviews and choose a reputable seller to ensure you’re getting high-quality seeds.
Seed Swaps and Gardening Communities
Ah, the joy of connecting with fellow garden enthusiasts! Seed swaps and gardening communities are fantastic places to find not only amaryllis seeds but also a wealth of knowledge and advice from seasoned gardeners. So grab your gardening hat and join these communities to score some incredible amaryllis seeds while making new friends along the way.
The Joy of Growing Your Own
Now that you’ve tracked down the elusive amaryllis seeds, it’s time for the real fun to begin! Growing your own amaryllis from seeds can be both rewarding and exciting. With a little patience, care, and a touch of luck, you’ll soon have your very own vibrant amaryllis flowers brightening up your space.
Tips for Growing Amaryllis from Seeds
To give yourself the best chance of success, here are a few helpful tips for growing amaryllis from seeds:
1. Patience is a Virtue
Growing amaryllis from seeds takes time, so be prepared for a bit of a waiting game. It can take several years for your seeds to grow into mature bulbs that will produce those beautiful blossoms you’re dreaming of. But remember, good things come to those who wait!
2. The Magic of Germination
Germination is the magical moment when your seeds sprout and begin their journey towards becoming magnificent amaryllis plants. To improve your germination odds, sow your seeds in a well-draining soil mix, keep them moist (but not waterlogged), and provide them with a warm and cozy environment.
3. A Little TLC Goes a Long Way
Once your amaryllis seeds have germinated and started growing, it’s crucial to give them some tender loving care. Provide them with adequate sunlight, water them regularly (but don’t drown them!), and watch as they flourish and grow into stunning plants.
Happy Planting!
Now that you have the inside scoop on where to find amaryllis seeds and some tips for growing them, it’s time to put on your gardening gloves and get started on your journey. May you be blessed with beautiful blooms and the joy of watching your amaryllis plants thrive. Happy planting!
How to Pollinate Amaryllis
Before we dive into the exciting world of amaryllis pollination, let’s take a moment to appreciate the beauty of nature’s matchmaking game. Pollination is the magical process where pollen from the male reproductive parts of a flower transfers to the female reproductive parts, leading to the creation of new seeds. In the case of amaryllis, these striking flowers rely on pollination to reproduce and bring forth their vibrant offspring.
The Art of Playing Cupid
As eager plant parents, we can assist amaryllis in their quest for pollination by playing the role of cupid. But how, you ask? Well, fear not! We are about to share some tips and tricks to make your amaryllis flowers fall head over petals in love.
Step 1: Gathering the Tools of Love
To kickstart the pollination process, you’ll need some essential tools by your side. Grab a paintbrush or a cotton swab—your trusty “love wand.” Prepare a small container with a mixture of equal parts water and sugar. This homemade love potion will serve as your pollen carrier, attracting the attention of potential mates.
Step 2: The Dance of Seduction
First, locate the stamen—the male reproductive part—in the center of the amaryllis flower. Gently brush the stamen with your love wand to collect some pollen. Remember, gentle strokes make for happy pollination!
Step 3: The Power of Persistence
Time to seek out the stigma—the female reproductive part—carefully tucked away beneath the stamen. With a delicate touch, transfer the collected pollen from your love wand to the awaiting stigma. If you nail this part, congratulations! You’ve just played a crucial role in amaryllis love affairs.
Step 4: Patience is a Virtue
Once pollinated, the amaryllis should proudly display its swollen seed pod, a sign of a successful match made in flower heaven. While you wait for the pod to ripen, don’t forget to channel your inner Zen guru. Patience is key when it comes to amaryllis seed production.
Step 5: Harvesting the Fruits of Your Labor
When the seed pod turns a light brown shade and starts to crack open, it’s time to collect those precious amaryllis seeds. Gently gather the seeds and store them in a cool, dry place until you’re ready to embark on the next chapter of amaryllis propagation.
Now that you’ve become an honorary matchmaker, equipped with the knowledge of amaryllis pollination, it’s time to put your skills to the test. Remember, pollination requires a touch of finesse, a sprinkle of love, and a dash of patience. So, grab your love wand and create floral love stories that nature would be proud of!
How to Propagate Amaryllis: From Seeds to Blooms
So, you want to embark on the thrilling journey of propagating amaryllis seeds? Well, hold on tight because this adventure is not for the faint of heart! But fear not, fellow plant enthusiasts, for I am here to guide you through the wondrous world of amaryllis propagation.
The first step in this grand endeavor is to obtain some amaryllis seeds. You can either purchase them online or harvest them from a mature amaryllis plant. Once you have those tiny, miraculous specks of life in your hands, it’s time to sow them. But where, you ask? Well, let’s find out!
Ain’t No Party Like a Germination Party!
To give your amaryllis seeds the best chance of flourishing, you need to create the perfect germination environment. Start by filling a small pot with a well-draining soil mix. Make sure it’s loose and airy, just like a fluffy cloud. Then, gently press the seeds into the soil, leaving a comfortable distance between them. Remember, even amaryllis seeds need their personal space.
Now, cover the pot with a clear plastic bag, creating a mini-greenhouse for your precious seedlings. This makeshift greenhouse will keep the moisture levels just right, like a spa for baby plants. Place the pot in a warm, sunny spot, but be careful not to expose it to direct sunlight. We don’t want our seedlings to turn into crispy critters!
Patience, Young Grasshopper: The Waiting Game Begins
Ah, the waiting game. This is where patience becomes your closest ally. The germination process can take anywhere from a few weeks to a couple of months. So, sit back, relax, and try not to disturb your little green babies. Remember, they’re doing their best to sprout and grow into magnificent amaryllis plants.
While you wait, it’s essential to keep the soil moist but not waterlogged. Think of it as finding the perfect balance between hydration and suffocation. You don’t want to drown the poor seeds, do you? Of course not! A little sprinkle of water every now and then should do the trick.
Tiny Sprouts, Big Dreams: The Arrival of Seedlings
Huzzah! After what feels like an eternity, you’ll start to notice tiny green shoots emerging from the soil. It’s a momentous occasion, worthy of a little happy dance (or a big one, if you’re feeling particularly jubilant). Your amaryllis seedlings have arrived!
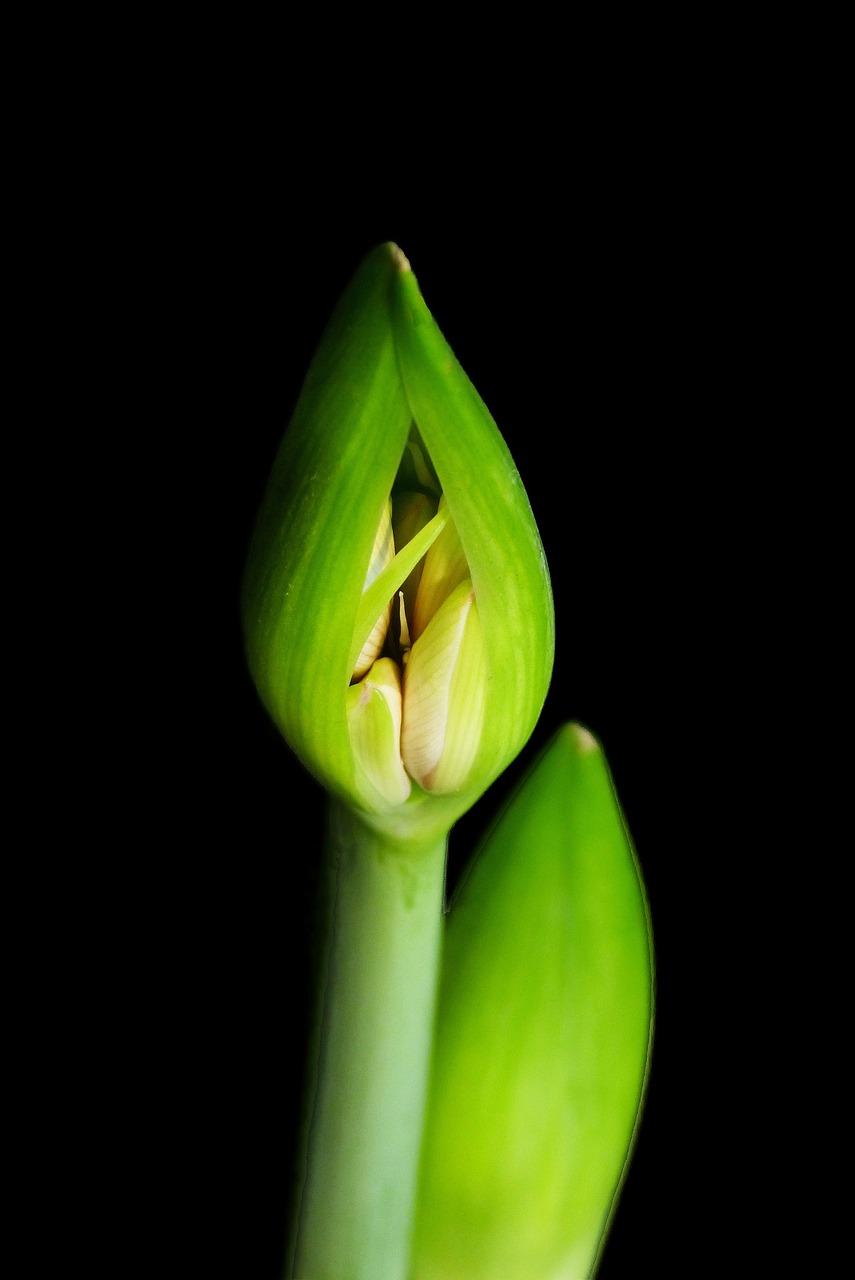
At this stage, it’s time to remove the plastic bag and give your sprouts a taste of the real world. Gradually expose them to more sunlight, gradually increasing their sunbathing time. Think of it as a gentle transition from the cozy indoors to the great outdoors. After all, we don’t want our little ones to get sunburned, now do we?
Tender Loving Care: Nurturing Your Seedlings into Blooming Beauties
As your amaryllis seedlings grow taller and stronger, they’ll need a little extra TLC. Transplant them into larger pots, giving their roots ample room to spread and explore. Use a well-draining soil mix similar to the one used during germination. We want our young plants to have happy, healthy roots, don’t we?
While your amaryllis babies continue to grow, make sure to provide them with plenty of sunshine, regular watering, and some occasional fertilization. Think of it as a nourishing spa day for your plants. And remember, a happy plant is a blooming plant!
Congratulations, my green-thumbed friend! You have successfully embarked on the amaryllis propagation journey. From sowing the seeds to nurturing the seedlings, you have witnessed the miracle of life unfold before your very eyes. So go forth, share your newfound wisdom, and let your garden be adorned with the stunning blooms of amaryllis!
Growing Amaryllis Outdoors in Zone 8
Amaryllis, with its splendid blooms and vibrant colors, is a popular choice for indoor gardening. But did you know that you can also grow amaryllis outdoors, even in Zone 8? Yes, you heard that right! With a little bit of knowledge and a touch of magic, you can bring the beauty of amaryllis to your outdoor garden and let it dazzle your senses.
Embrace the Zone 8 Charm
Living in Zone 8 has its perks, like mild winters and longer growing seasons. This means that you have the perfect environment to nurture and grow amaryllis outdoors. Picture this: the delightful sight of amaryllis bulbs gently pushing through the soil in your garden, just waiting to burst into a kaleidoscope of colors. It’s like having your own personal fireworks display, but with flowers!
Preparing the Perfect Spot
Before starting your amaryllis outdoor adventure, you need to find the perfect spot for these magnificent plants. Choose an area in your garden that receives full or partial sunlight, as amaryllis thrives in bright, indirect light. A location that gets around six hours of sunshine a day is ideal. Plus, make sure the soil has excellent drainage to prevent waterlogged roots—a surefire way to make your amaryllis unhappy.
Planting Party Time
Now that you’ve found the perfect spot, let’s get planting, shall we? Begin by digging a hole that is about twice the size of the bulb—think of it as a cozy bed for your amaryllis. Place the bulb in the hole with the pointed end facing up. Look, you’ve just tucked your amaryllis into bed! Gently cover the bulb with soil, leaving about one-third of it exposed. Remember, you want your amaryllis to have a good view of the world!
Tender Loving Care
Once your amaryllis is snug in the ground, it’s time to shower it with some tender loving care. Water your newly planted bulb thoroughly, ensuring that the soil is evenly moist but not soaked. You don’t want your amaryllis to turn into a waterlogged drama queen, do you? Keep the soil consistently moist during the growing season, but be cautious not to drown it with excessive watering.
The Waiting Game
Now comes the hardest part—being patient! Amaryllis takes its own sweet time to emerge and greet the world with its magnificent blooms. But fear not, for it will be worth the wait. In Zone 8, amaryllis typically sends up its tall, elegant stalks in spring or early summer. Be prepared to be mesmerized by the stunning trumpet-shaped flowers that will grace your garden. And just like that, your patience will be rewarded tenfold!
Maintenance Made Fun
Taking care of your amaryllis outdoors doesn’t have to be a chore. In fact, it can be a delightful experience. Keep an eye out for any pesky weeds that may try to invade your amaryllis’ personal space. And if they dare show up, show them who’s boss by gently pulling them out. Adding a layer of mulch around your amaryllis will not only keep weeds at bay but also help with moisture retention—like a little blanket for your plant.
The Art of Blooming
As your amaryllis blooms, you’ll want to support its magnificent stalks to prevent any unwanted bending or breaking. Use stakes or supportive ties to give your amaryllis the help it needs to stand tall and proud. Just imagine your amaryllis strutting its stuff, captivating your neighbors and passersby with its eye-catching display. It’s like having a celebrity in your garden, without the paparazzi!
Farewell and Future Adventures
Sadly, all good things must come to an end. As your amaryllis finishes its blooming extravaganza, the flowers will eventually fade. But don’t despair! Cut the stalk close to the base, allowing the leaves to continue absorbing sunlight and energy. This will help fuel the bulb for future bloom-filled adventures. With a little bit of care and patience, your amaryllis will delight you year after year, creating memories and bringing joy to your outdoor garden in Zone 8.
Growing amaryllis outdoors in Zone 8 is a delightful journey filled with anticipation, beauty, and rewards. By finding the perfect spot, providing proper care, and giving a little support, you can bring the charm and allure of amaryllis to your outdoor garden. So, embrace your Zone 8 magic and let your amaryllis dazzle with its breathtaking blooms. Happy gardening!
Can I grow an amaryllis from seed
If you’ve ever come across a stunning amaryllis flower and thought, “Could I grow one of those from seed?” – well, you’re not alone. The idea of nurturing a delicate flower from its humble beginnings is a romantic notion that many gardeners, both novice and experienced, entertain. So, let’s delve deeper into the question: Can you grow an amaryllis from seed?
The Seed Story
The Amusing Seed Journey
Before we rush off to sow some amaryllis seeds, let’s first understand their journey. Amaryllis seeds embark on a whimsical adventure of their own, making their way from plant to garden centers around the world. And oh, what a journey it is! Picture a tiny seed, traveling across land and sea, hitching rides on the winds of chance, all in the pursuit of its horticultural destiny. It’s like a tiny seed pirate on a scintillating quest!
Challenges Aplenty
The Quest for Patience

Now, let’s address the elephant in the room: growing amaryllis from seed isn’t a walk in the park. In fact, it requires a good dose of patience and a sprinkle of luck. First off, the seeds take their sweet time to germinate. Sometimes, it feels like waiting for your favorite TV show to return after a cliffhanger season finale – the anticipation can drive you positively insane!
The Need for Expertise
If you’re a seasoned gardener, you’re probably familiar with the saying “Patience is a virtue.” Well, when it comes to growing amaryllis from seed, that saying holds true. This process requires some horticultural know-how and a touch of wizardry. You’ll need to provide optimum conditions and delicately balance light, temperature, and humidity like a maestro conductor in a symphony of growth.
The Journey Begins
Sowing Your Seeds of Hope
So, you’ve decided to take on the noble challenge of growing amaryllis from seed? Bravo! The first step is to acquire those elusive seeds. You can find them online, at garden centers, or even swap with fellow garden enthusiasts. Once you’ve got your hands on them, it’s time to get down and dirty (figuratively, of course).
The Ritual of Germination
Start by planting the seeds in a well-draining potting mix, providing them with a cozy bed to rest in. Patience, my dear gardening enthusiast, is the key here. Keep the soil consistently moist, but not soaked, and wait for those precious green shoots to emerge. It’s like waiting for a shy friend to come out of their shell – exciting and nerve-wracking all at once!
The Care and Feeding of Seedlings
Nurturing Tender Souls
Once your amaryllis seedlings emerge from their cozy slumber, they’ll need some tender loving care. Provide them with plenty of bright, indirect light, as if you were giving them front row seats to a breathtaking sunset. But remember, moderation is key. Too much direct sunlight can scorch their delicate leaves and stunt their growth, like an overeager sunburn at the beach.
The Delicate Balance
As your seedlings grow, you’ll need to maintain a delicate balance of watering and feeding. Think of it as a nurturing dance, where you provide just the right amount of nourishment without overwhelming their tiny roots. This dance requires a light touch and a keen sense of observation, as you adjust your care according to their needs.
The Finale
The Reward of Patience
After months of vigilant care and unwavering dedication, the time will come when your amaryllis seedlings finally mature into blooming beauties. Picture yourself standing in front of a majestic floral tableau, feeling like an accomplished inventor who has just created the perfect masterpiece. It’s a moment of triumph and pure horticultural joy!
So, my dear reader, while growing amaryllis from seed is a laborious and time-consuming process, it is indeed possible. Just remember to arm yourself with patience, knowledge, and a sprinkle of whimsy, and you too can embark on this enchanting horticultural journey. Happy growing!
Do Amaryllis Seeds Turn into Bulbs
If you’re a plant enthusiast or even someone with just a little green thumb, you might have come across the term “amaryllis seeds” during your gardening research. While amaryllis is commonly known for its stunning flowers, you might be wondering if its seeds can turn into bulbs. Well, get ready to dig deep into the wonderful world of amaryllis seeds!
Understanding Amaryllis Seeds
Amaryllis seeds are small, brownish, and somewhat papery in texture. They look like tiny flecks of potential beauty, just waiting for the right conditions to burst into life. But do these seeds have the magical ability to transform into bulbs? Let’s find out!
The Transformation Process
Contrary to what you might expect, amaryllis seeds don’t directly turn into bulbs like some sort of plant metamorphosis. Instead, these seeds follow a more roundabout route to bulb-hood. So how does it work?
Time for Germination
To begin their transformation, amaryllis seeds need to go through a process called germination. This is when the seed starts to sprout, sending out a tiny root that seeks moisture and nutrients. It’s like a plant’s equivalent of sticking its toe in the soil to test the waters!
Patience is a Virtue
Once the seed has successfully sprouted, it doesn’t mean you’re just a hop, skip, and a jump away from a full-grown bulb. Oh no, my green-thumbed friend, the transformation process has just begun! Amaryllis seeds require patience, as it can take several years of proper nurturing for them to develop into bulbs.
The Waiting Game
During those years of waiting, the sprouted seed will continue to grow and develop, eventually forming a small bulb. This emerging bulb is still quite tender and needs time to strengthen its roots and grow bigger. So don’t expect a miraculous overnight bulb miracle!
The Power of Time
With each passing year, the bulb will gradually increase in size, gaining strength and vitality. It’s like watching a child grow up before your eyes, but instead of witnessing their first steps, you get to marvel at a burgeoning bulb. It’s a slow process, but it’s oh so worth it!
While amaryllis seeds may not directly transform into bulbs, they have the potential to grow into beautiful bulbs with time, patience, and proper care. So if you find yourself marveling at those tiny amaryllis seeds, envision their future as majestic bulbs. Remember, good things come to those who wait… and garden!
Sources:
– https://www.bhg.com/gardening/houseplants/care/guide-to-growing-amaryllis/
– https://www.almanac.com/plant/amaryllis
Can Amaryllis Survive the Winter Outside
If you’re a proud owner of amaryllis plants, you may be wondering if these vibrant beauties can withstand the harsh winter temperatures. Can they tough it out and stay outside, or should they hibernate indoors? Let’s dig deeper (pun intended) into the question of whether amaryllis can survive the winter outdoors.
Making Sense of Winter-Hardy Amaryllis Varieties
Some amaryllis varieties are considered winter-hardy, which means they have the remarkable ability to withstand chilly weather conditions. These tough cookies won’t wimp out when Jack Frost pays a visit. They’ll endure and still manage to grace your garden with their flamboyant blooms.
Amaryllis: The Drama Queen of Flowers
Generally, amaryllis is known for its diva-like tendencies. It thrives in warm, tropical regions, flaunting its velvety petals and attracting adoring gazes. However, when faced with freezing temperatures, this delicate flower turns into a bit of a drama queen. It prefers to bask in the comfy confines of your cozy home.
Giving Winter the Cold Shoulder
Although some amaryllis varieties can handle a bit of chill, most would rather keep their fancy outfits out of the snowy scene. When exposed to frosty conditions, their leaves may wither and their chances of flowering dwindle. So unless you want to witness a botanical fashion disaster, it’s better to play it safe by keeping them indoors.
Protecting Your Precious Blossoms
If you’re still determined to let your amaryllis brave the outdoor elements, a little extra care can go a long way. Digging up the bulbs before the first freeze and storing them in a cool, dry place can help protect them from the winter cold. Just make sure to mark the spot where they were buried, because these little guys can be tricky to find once the garden is blanketed with snow.
The Great Winter Escape
Imagine this: The chill sets in, frost blankets the ground, and your amaryllis bulbs have safely sought refuge indoors. Your cozy home becomes their winter resort, complete with room service (aka regular watering) and a nice, warm spot by the window. As you gaze at their leafy green foliage, you can almost hear them whispering “thank you” for saving them from the icy grip of winter.
Wrapping Up
So, can amaryllis endure the winter outside? While a few cold-resistant varieties can hold their own, most of these showstoppers prefer to spend the winter months tucked away in the comfort of your home. With a little TLC and some indoor pampering, your amaryllis can emerge from their winter slumber ready to make a grand entrance come springtime. So, go ahead and give them the VIP treatment they deserve!
What Do I Do with Amaryllis Seed Pods
So, you’ve grown beautiful amaryllis flowers from seeds. Congrats, green thumb! But now you find yourself staring at these intriguing pods, wondering what to do with them. Fear not, my fellow plant enthusiast, for I shall unravel the mysteries of amaryllis seed pods and guide you through this botanical adventure!
Harvesting the Pods
Before diving into the exciting world of amaryllis seed pod utilization, let’s quickly discuss the simple process of harvesting these little seed treasures. Wait for the flowers to fade and the petals to gracefully fall, revealing the green pod beneath. Once the pod turns brown and starts to split open, you know it’s ready for harvest. Show a little TLC by gently removing the pod from the stem, being careful not to damage it. Voila! You now possess the key to your amaryllis plant’s future generations.
Redefining Your Grant of Seeds
Once you have your amaryllis seed pods, you might be tempted to channel your inner fairy godmother and start flinging seeds all over the place, hoping for an enchanting floral wonderland. But hold your excitement for a moment, my horticultural wizard. Let’s explore a couple of options for your newfound botanical booty.
1. Grow Your Amaryllis Army
One way to make use of your amaryllis seeds is to raise a whole army of these majestic flowers. Plant the seeds in a well-draining soil mix, keeping them slightly moist but not drowning in water. Patience is key – it may take a while for these little gems to sprout. And remember, not all seeds will grow into viable plants, so don’t lose hope if some decide to take an extended vacation beneath the soil. These seeds are just picky like that.
2. Share the Seed Love
In the spirit of spreading plant joy, why not share some of your amaryllis seeds with fellow green thumbs? Share the gardening love by gifting these little wonders to friends or family members who appreciate the beauty of nature. Just imagine the smiles on their faces as they embark on their own amaryllis adventure, courtesy of you, the ultimate plant connoisseur!
3. Save Seeds for a Rainy Day
If you’re not quite ready to sow all your amaryllis seeds immediately, fear not! These captivating pods can be dried and stored for future planting endeavors. Simply place the seeds in a cool, dry place, like a paper envelope or small container, and store them until the time is right. And when that day comes, you’ll have a magical stash of amaryllis seeds ready to sprout into a flourishing display of beauty!
Amaryllis seed pods not only hold the promise of future blooms, but also provide you with delightful options. Whether you choose to grow an amaryllis army, spread the seed love, or save seeds for a later date, these pods are bursting with potential. So go forth, my green-thumbed friend, and let your amaryllis adventures continue!
When Should You Plant Amaryllis Seeds
We all know that with great power comes great responsibility, but did you know that with great amaryllis seeds comes great timing? If you want your flower kingdom to flourish, it’s crucial to get the timing just right. Here’s a breakdown of the best time to plant those tiny seeds of glory.
Spring Splendor: Planting Your Amaryllis Seeds at the Perfect Season
Spring is nature’s way of saying, “It’s time to get your green thumb on!” That’s right, my budding gardeners, spring is the prime time to sow your amaryllis seeds. The glorious combination of warmer temperatures and longer daylight hours provides the ideal conditions for these little beauties to sprout and grow.
Frosty Follies: Amaryllis Seeds and the Dreaded Frost
Ah, frost, the arch-nemesis of all gardeners. Before you make any impulsive seed-dropping decisions, make sure to check the frost forecast. Amaryllis seeds are delicate and sensitive creatures, just like those drama queens in a reality TV show. They can’t handle the cold brutality of frost, so be sure to wait until all frost warnings have bid us adieu.
Late Bloomers: Patience is a Virtue with Amaryllis Seeds
Growing amaryllis seeds requires enough patience to rival waiting for your favorite pizza delivery after a grueling workout. Germination can take up to eight weeks, my friends, so don’t panic if you don’t see overnight miracles. Just be patient, and soon enough, Mother Nature will reward you with her floral wonders.
The Winter Wonderland: Amaryllis Seeds and the Holiday Spirit
If you’re looking to add a touch of magic to your holiday season, planting amaryllis seeds is a fantastic idea. By starting the planting process in late fall, you can witness the awe-inspiring bloom of these festive flowers right around Christmas. Imagine the joy of unwrapping not just presents but also the breathtaking beauty of flowering amaryllis.
Making the Right Call: Adjusting Planting Time Based on Location
Now, folks, you have to play Mother Nature’s game but with a twist of your own strategy. If you live in a region with a milder climate, planting amaryllis seeds in early fall is a smart move. However, if you’re a tough nut braving harsher winters, it’s better to wait until spring. Remember, it’s all about adapting and thriving within your unique environment.
Time Flies When You’re Planting Amaryllis Seeds
As the saying goes, “Time flies when you’re having fun,” and trust me, planting amaryllis seeds is an absolute joyride. Now that you know the ideal times to sow these magnificent seeds, it’s time to get down and dirty in your garden. Get ready for a showstopping floral performance that will brighten your days and make your neighbors green with envy. Happy planting!
How long does it take for an amaryllis to sprout
Amaryllis seeds have a reputation for taking their sweet time to sprout, testing the patience of even the most ardent gardeners. So, exactly how long does it take for these delightful flowers to make their appearance? Let’s dive into the world of amaryllis sprouting and uncover the secrets behind their slow but steady growth.
A Slow Dance with Time
Patience is a virtue, they say. And when it comes to amaryllis sprouting, truer words have never been spoken. From planting the seeds to witnessing the first sign of life, you’ll need to muster your patience and settle in for a slow dance with time.
The Waiting Game Begins
Once you plant those amaryllis seeds, it’s time to embrace the waiting game. And boy, do these little seeds take their sweet time! It can take anywhere from a few weeks to a couple of months before you see any green sprouts pushing through the soil. So, don’t get discouraged if there’s no action in the first few days – amaryllis likes to keep you on your toes!
Amaryllis: The Master of Suspense
If amaryllis were a character in a thriller novel, they’d undoubtedly be the master of suspense. Just when you think nothing’s going to happen, these sneaky seeds decide to surprise you. So, keep an eye on that pot of soil because, sooner or later, you’ll spot the unmistakable signs of life.
The Journey from Seed to Sprout
As the days turn into weeks, you might start questioning whether those amaryllis seeds are just playing a prank on you. But fear not, as the marathon from seed to sprout is filled with intricate steps that require time and patience. The roots will slowly establish themselves in the soil, followed by the emergence of a tiny green shoot. This is the magical moment when you know your baby amaryllis is on its way!
Can’t Rush Perfection
It’s important to remember that amaryllis is like a fine wine – it takes time to reach perfection. So, resist the urge to intervene and try to speed things up. Mother Nature has her own timeline, and she knows what she’s doing. Trust the process and let those amaryllis seeds take their time to sprout into glorious, vibrant flowers.
Wrap-up
In the world of amaryllis, sprouting is not a sprint but a marathon. These seeds might test your patience, but the reward is well worth the wait. So, sit back, relax, and enjoy the slow dance with time as you witness the wonder of nature unfolding before your eyes. Soon enough, those amaryllis seeds will sprout into magnificent flowers, reminding you that good things do come to those who wait.