Are you considering a home renovation or simply looking for ways to make your kitchen or bathroom more functional? Adding a sink to an existing plumbing system may be just the solution you need. But is it as simple as it sounds? What do you need to keep in mind before you start your DIY project?
In this comprehensive guide, we’ll explore all you need to know about adding a sink to your existing plumbing system. We’ll cover everything from connecting to existing drainage, tapping into a vertical drain line, tying into an existing sewer line, and connecting sink drains to wall pipes.
Moreover, we’ll answer some common questions such as – Can you put a sink in any room? Can two sinks share the same drain? How much does it cost to install a new sink drain? We’ll also delve into more specific subjects such as how to connect pipes under the sink and even, installing a sink in the basement without a drain.
Whether you’re a seasoned DIY-er or a complete beginner, this comprehensive guide will equip you with all the knowledge you need to complete your project successfully. So, grab your tools, put on your thinking cap and let’s get started on adding a sink to your existing plumbing!
Adding a Sink to Existing Plumbing

Are you tired of sharing a sink with your partner? Or do you need an extra sink in your bathroom or kitchen? You don’t have to spend a fortune to install a new one. In this section, we’ll take you through what you need to add a sink to existing plumbing.
Determine the Type of Sink You Need
The first step is to determine the type of sink you want to install. There are several types, including pedestal, wall-mount, drop-in, and under-mount sinks. You should choose a sink that fits your needs, preferences, and budget.
Prepare the Plumbing
Once you’ve chosen your sink, the next step is to prepare the plumbing. Turn off the water supply and drain the pipes. Then, remove the old sink and the drain pipes. If you’re replacing an old sink, it’s a good idea to replace the drain pipes too.
Install the New Sink
Before you install the new sink, you need to assemble the drain pipes. Connect the p-trap to the tailpiece of the sink, and connect the water supply lines. Make sure everything is tight, and there are no leaks.
Connect to the Existing Plumbing
Now, it’s time to connect the new sink to the existing plumbing. Position the sink in place, and mark the location of the holes for the faucet and handles. Make the necessary holes, and install the faucet and handles.
Test the Sink
After you have installed the new sink, turn on the water supply and test the sink. Check for leaks and make sure the water flow is good. Congratulations! You have successfully added a new sink to your existing plumbing.
In conclusion, adding a sink to existing plumbing is a simple and cost-effective way to improve your home’s functionality and style. With the right tools, materials, and guidance, anyone can do it. So why not give it a try?
Adding Sink to Existing Drain
So, you’ve decided to add a new sink to your existing plumbing system, but you’re not sure how to do it. Adding a sink to existing drain is a little bit more complicated than just installing a new one, but it’s still doable. In this section, we’ll go over everything you need to know to get the job done right.
Check Your Existing Plumbing
Before you start installing a new sink, you need to check your existing plumbing to make sure it can handle the additional load. If your house has older plumbing, it may not be up to code and might need to be updated before you can install a new sink.
Measure and Cut the Hole for the Sink
Once you’re sure your plumbing can handle the new sink, the next step is to measure and cut the hole for the sink. You’ll need to use a jigsaw or a hole saw to cut the hole, so make sure you have the right tools on hand.
Install the Sink
After the hole is cut, it’s time to install the sink. Start by attaching the mounting hardware to the underside of the sink, then place the sink into the hole. Make sure the sink is level and secure before moving on to the next step.
Connect the Drain and Water Lines
Now that your sink is securely in place, you need to connect the drain and water lines. This is where things can get a little tricky, especially if you’re not familiar with plumbing. If you’re not confident in your abilities, it’s best to hire a professional plumber to do the job.
Test the Sink
After everything is connected, turn on the water and run it for a few minutes to make sure everything is working correctly. Check for leaks, and if everything looks good, your new sink is ready to use.
In conclusion, installing a new sink can be a challenging task, but with the right tools and some basic plumbing knowledge, you can do it yourself. Just make sure you take the time to check your existing plumbing, measure and cut the hole carefully, and connect the drain and water lines correctly.
Can You Put a Sink in Any Room
Are you thinking of adding a sink to your home, but not sure which room to choose? Well, the good news is that you can put a sink in almost any room in your home. Let’s look at some of the most popular rooms where a sink can be installed.
Kitchen
The kitchen is the most common room where a sink is installed. It is essential for washing dishes, cleaning ingredients, and maintaining overall cleanliness. When adding a sink to your kitchen, you have a wide variety of styles and materials to choose from, including stainless steel, porcelain, and granite.
Bathroom
A bathroom sink is a must-have for any bathroom. It is essential for washing your hands, brushing your teeth, and maintaining hygiene. Bathroom sinks come in different shapes, sizes, and styles. You can choose between a pedestal sink, wall-mounted sink, or a vanity sink.
Laundry Room
A sink is a great addition to any laundry room. It provides a convenient place to wash clothes and clean up after using the washer and dryer. When selecting a sink for your laundry room, consider the size of your appliances and the amount of space you have available.
Basement
Adding a sink to your basement is an excellent way to create a functional space for various activities. A sink is especially useful if you want to use your basement as a workshop or entertainment area. You can choose a utility sink that is durable and easy to clean.
Garage
A garage sink is an excellent addition for those who love to work on their cars or do woodworking. It provides a convenient place to clean up tools and wash your hands. When adding a sink to your garage, make sure it is durable enough to withstand heavy usage.
In conclusion, you can put a sink in almost any room in your home. Whether it’s your kitchen, bathroom, laundry room, basement, or garage, adding a sink is a great way to make your space more functional and convenient. Take the time to choose a sink that fits your specific needs and style preferences.
Adding a Sink to Existing Plumbing: Connecting to Existing Drainage
When it comes to adding a sink to your existing plumbing, connecting to existing drainage is one of the most crucial steps. Disconnecting the existing drainage and routing a new pipe can be a tedious task, not to mention expensive. In this section, we’ll discuss how to connect to existing drainage when adding a new sink to the existing plumbing.
Location of the Sink
Before connecting your sink to the existing drainage, you must decide on the location of the sink. If you’re adding a sink to your kitchen, it’s best to locate it near the dishwasher and garbage disposal. This simple step will save you a lot of trouble and expense in the long run. Bathroom sinks should be located near the shower or bathtub and the toilet.
Matching the Drainage Connection
When connecting your new sink to the existing drainage, it’s essential to ensure that the drain pipe size and fittings match. If they don’t, you need to install an adapter to connect the two pipes. You’ll find a wide variety of adapters at your local hardware store.
Measuring the Drain Pipe
To ensure that the drain pipe connections are correct, you must measure the diameter of the existing drain pipe and the new one. It’s essential to use the right size pipes to prevent leaks and plumbing disasters.
Cutting the Drain Pipe
Once you’ve measured the diameter of the pipes, it’s time to cut the existing drain pipe to the right length. Using a hacksaw, carefully cut the existing drain pipe to the desired length. You’ll also need to cut the new drain pipe to fit it into the existing drainage. Be sure to use a hacksaw, handsaw, or a power saw if you have one to get a clean, straight cut.
Connecting the Pipes
The next step is to connect the pipes. Apply a plumber’s putty or silicone caulk around the new drain pipe’s flange and insert it into the existing drainage. Secure the pipe with screws or nuts and bolts, depending on the type of connector you’re using. You’ll also need to connect the sink’s tailpiece to the new drain pipe using a P-trap. Ensure that all the connections are tight to prevent any leaks.
Connecting a new sink to existing drainage may seem like a daunting task, but it’s crucial to ensure that your plumbing system works correctly. Remember to measure the pipes carefully, cut them to the right length, and secure all the connections. With these simple steps, you can add a new sink to your existing plumbing without any hassle or inconvenience.
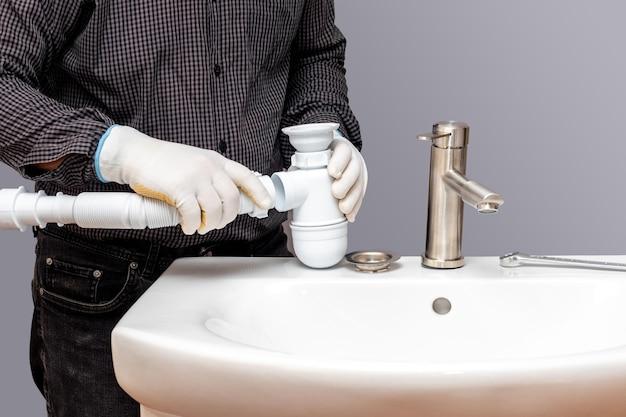
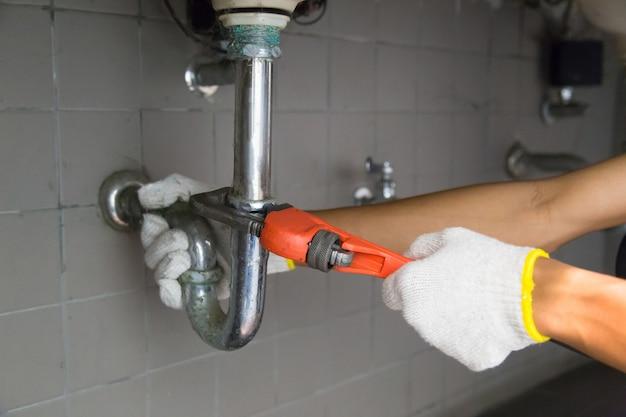
Connecting Pipes Under the Sink
When adding a sink to your existing plumbing, it’s crucial to properly connect the pipes underneath. Here’s how to do it:
Step 1: Prepare the Area
Before you start connecting the pipes, make sure the area is clean and dry. Put a bucket underneath to catch any water that might leak out.
Step 2: Connect the Tailpiece
The tailpiece is the pipe that extends down from the sink basin. Connect it to the sink strainer with a slip nut. Tighten it with a slip-joint plier.
Step 3: Install the P-Trap

The P-trap is a curved pipe that prevents sewer gases from entering your home. Insert the P-trap into the tailpiece and the waste drain. Make sure it’s aligned properly, then tighten the slip nuts.
Step 4: Connect the Water Supply
Attach the water supply lines to the faucet, then connect them to the shutoff valves. Tighten the nuts with an adjustable wrench.
Step 5: Test for Leaks
Turn on the water and check for leaks. If you find any, tighten the nuts further.
Congratulations! You’ve successfully connected the pipes under your sink. Remember to always turn off the water supply before working on plumbing. This simple precaution can save you from a lot of headaches and water damage.
Tying Into a Vertical Drain Line
Sometimes, you may need to add a new sink to an existing plumbing system by tying it into a vertical drain line. This is a common practice when you are installing a sink on an upper floor of your house, and the only option for the drain line is to go straight down.
Check Local Plumbing Codes
Before embarking on any plumbing project, it is essential to check your local plumbing codes. These codes dictate the proper installation and connection of fixtures to existing plumbing systems. Failure to adhere to these codes could result in costly fines and, in worst-case scenarios, dangerous plumbing disasters.
Locate the Vertical Drain Line
The first step in tying a sink to a vertical drain line is locating the line. You can do this by tracing the existing plumbing lines, which may require some demolition work. Once you locate the vertical drain line, you can then determine the appropriate connection method.
Use a Wye Fitting
To connect your sink to the vertical drain line, we recommend using a wye fitting. This is a fitting that connects to the vertical drain line at a 45-degree angle and has an inlet on the side for the sink drain line. This method ensures that the wastewater from the sink flows directly into the vertical drain line without any issues.
Call a Professional Plumber
If you are unsure of how to tie your new sink into a vertical drain line or encounter any issues, don’t hesitate to call a professional plumber. They have the expertise and tools necessary to ensure your plumbing project is a success. It may cost you some money upfront, but it will save you from costly repairs down the road.
When tying a sink to a vertical drain line, it is essential to follow local plumbing codes, locate the vertical drain line, use a wye fitting, and call a professional plumber if needed. By following these steps, you can ensure a safe and successful plumbing project that adds value to your home.
Tapping into Existing Sewer Line
If you’re adding a sink to an existing plumbing system, you’ll need to tap into the existing sewer line to get rid of the wastewater. Here are some steps you can follow to get the job done:
Step 1: Determine the Location of the Sewer Line
Before you start cutting into pipes, you need to know where the sewer line is located. Start by looking at the plumbing plans for your house. If you don’t have them, try to find the cleanout or access point for the sewer line. You can also call a plumber to help you locate the line if you’re not sure.
Step 2: Cut Into Main Drain Line
Once you’ve located the sewer line, you’ll need to cut into the main drain line. Depending on the layout of your plumbing system, you may need to cut into a vertical or horizontal pipe. Make sure to turn off the water supply and use the right tools to avoid causing any damage to the pipes.
Step 3: Install PVC Pipe and Fittings
After cutting into the main drain line, you’ll need to install a PVC pipe and fittings to connect the new sink drain. Make sure to choose the right size of PVC pipe and fittings for the job. You can also use a PVC primer and cement to secure the joints.
Step 4: Test the New Plumbing System
Once you’ve installed the new plumbing system, it’s time to test it to make sure it’s working properly. Turn on the water supply and let the water run for a few minutes. Check for any leaks or blockages and fix them if necessary.
Adding a sink to an existing plumbing system is a big job, but tapping into the existing sewer line doesn’t have to be complicated. By following these steps and using the right tools and materials, you can install a new sink drain that works efficiently and effectively.
Can Multiple Sinks Share The Same Drain
Adding a sink to existing plumbing can often be challenging, particularly when it comes to drainage. One of the most common questions that most homeowners ask is whether two sinks can share the same drain. The answer is yes, but you need to comply with certain rules and regulations.
Installing Two Sinks on the Same Drain
Installing two sinks on the same drain can be a good idea, particularly when space is limited. It’s a common practice in most small bathrooms or kitchens with limited floor space. However, before you decide to do it, you must be aware of some rules that you need to comply with.
Check Your Local Plumbing Code
Before you begin any installation, you need to check your local plumbing code. The plumbing codes may vary depending on your location, and it’s essential to comply with the rules. For instance, in some areas, the code might require you to have a separate P-trap for each sink. At the same time, in other areas, it might allow two sinks to share one P-trap.
Avoid Overloading the Drain
You should also ensure that the drainage system can handle the additional water. Overloading the drain may lead to clogging and even severe plumbing problems. Make sure that the drain size can handle the water from both sinks to prevent any problems.
Consider Hiring A Professional Plumber
Lastly, when installing multiple sinks on the same drain, it’s always advisable to hire a licensed professional plumber. Plumbing can be tricky and complex, and a small mistake can cause severe damage to your plumbing system. A professional plumber will ensure that everything is correctly installed and compliant with the local plumbing codes.
In conclusion, yes, two sinks can share the same drain. However, before installing them, you must ensure that your plumbing system can handle the additional water. Make sure that you comply with the local plumbing codes, and if possible, hire a professional plumber to do the installation for you.
Connecting Sink Drain to Wall Pipe
When it comes to adding a sink to existing plumbing, connecting the sink drain to the wall pipe can be one of the trickier aspects. But don’t worry, we’ve got you covered with this step-by-step guide!
Step 1: Prepare the Area
Before you start, make sure you have all the necessary tools and materials. You’ll need a wrench, plumber’s putty, plumber’s tape, PVC pipe, and a drain assembly.
Step 2: Remove the Old Drain
If you’re replacing an old sink, start by removing the old drain and any other parts that are no longer needed. Use a wrench to loosen the nuts that connect the drain assembly to the sink and the wall pipe, then remove the assembly.
Step 3: Install the New Drain
Take the new drain assembly and apply plumber’s putty to the underside of the flange. Insert the flange into the sink’s drain hole and tighten it from underneath. Use a wrench to tighten the nut.
Step 4: Connect the Pipe
Next, attach the PVC pipe to the drain assembly. Apply plumber’s tape to the threads on both the pipe and the drain assembly to ensure a tight seal. Use a wrench to tighten the nuts.
Step 5: Test for Leaks
Once everything is connected, turn on the water and check for any leaks. If you see water dripping or pooling anywhere, tighten the nuts a little more until the leaks stop.
Connecting a sink drain to a wall pipe may seem daunting at first, but with the right tools and a little know-how, you can do it yourself. In just five steps, you can have a functioning sink that will make your life easier and more convenient.
Tapping into Existing Plumbing
If you have existing plumbing in your home, tapping into it to add a new sink can be a relatively straightforward process. Here are the steps you need to follow:
Determine the Location for the New Sink
Before you start tapping into your existing plumbing, you need to choose the location for the new sink. Make sure you pick a spot that is close to existing plumbing pipes, as this will make the installation process easier.
Turn Off the Water Supply
Next, turn off the water supply to the area where you’ll be adding the sink. This will prevent water from flowing into the pipes while you’re working and reduce the risk of leaks or flooding.
Add a T-Fitting or Y-Fitting to the Existing Plumbing
The easiest way to tap into existing plumbing is to add a T-fitting or Y-fitting to the existing pipes. These fittings have a branch that you can attach a new pipe to, which will lead to your new sink.
Install New Pipes to the Sink
Once you’ve added the fitting, you can install new pipes that branch off from the fitting and lead to the new sink. Be sure to use the correct type of pipe for the job, such as PVC, copper, or PEX.
Connect the Drain Line
Finally, you’ll need to connect the drain line from the new sink to the existing drain line. This may require cutting into the existing drain pipe and adding a new piece that accommodates the new sink’s drain.
By following these steps, you can tap into existing plumbing and add a new sink to your home with ease. Remember to turn the water supply back on, check for leaks, and test the sink before using it regularly.
How to Install a Sink in the Basement without a Drain
If you are thinking about adding a sink to your basement but don’t have a drain, don’t worry. In this section, we’ll go through the steps you can take to install a sink in your basement without a drain and still ensure that it is fully functional.
What You Will Need
To install a sink in your basement without a drain, you will need a few essential tools and materials. These include:
- A sink with the proper fitting for your water lines
- Piping and fittings for the drain
- A P-trap
- A bucket or large container
- PVC cement
Steps to Follow
- First, install the sink. Follow the manufacturer’s instructions to attach the sink to your water line.
- Then, create a drain for the sink. Place a bucket or large container under the sink, and run a PVC pipe from the sink to the bucket. Use PVC cement to connect the pipe to the sink and bucket securely.
- Next, install the P-trap. Attach one end of the P-trap to the sink drain, and the other end to the PVC pipe. Ensure that it is secure and watertight.
- Finally, test the sink by running water and checking for leaks. If there are no leaks, then the sink is properly installed.
Tips and Tricks
- Make sure to choose the right-sized sink for your space and plumbing.
- Always follow the manufacturer’s instructions for installing the sink and any other materials.
- Use PVC cement to ensure a secure and watertight connection.
- Check for leaks regularly and fix them as soon as possible.
By following these steps, you can successfully install a sink in your basement without a drain. It’s an easy and affordable way to upgrade your basement and make it more functional.
How to Add a Drain to Existing Plumbing
Adding a new drain to existing plumbing may seem like a daunting task, but with a few simple steps and the right tools, it can be done with ease. Here’s what you’ll need to get started:
Materials Needed:
- PVC pipes
- PVC primer and cement
- A hacksaw or PVC cutter
- A drain assembly kit
- Teflon tape
- A dry cloth
- Safety glasses and gloves
Step 1: Turn off the Water Supply
Before making any plumbing changes, ensure to turn off the water supply to your house.
Step 2: Plan the New Drain Location
Determine the location of the new drain and ensure that it will fit with existing plumbing.
Step 3: Measure, Cut, and Dry-Fit the PVC Pipe
Measure and cut the PVC pipe to the required length. Dry-fit the PVC pipe and ensure it fits perfectly with the already plumbed appliances.
Step 4: Connect the PVC Pipe
Apply PVC primer to the end of the PVC pipe and then apply PVC cement to the same area. Connect the new pipe into the existing plumbing.
Step 5: Install the Drain Assembly Kit
Install the drain assembly kit following the manufacturer’s instructions.
Step 6: Seal the Joints
Wrap the threaded parts of the pipe with Teflon tape to ensure a watertight seal.
Step 7: Test the New Drain
Once the installation is complete, turn on the water supply and check for any leaks. If everything seems okay, you’re good to go!
Adding a drain to existing plumbing may seem like a complicated task, but following these simple steps can make the job much more manageable. So, don’t be afraid to get your hands dirty and take on a new DIY plumbing project!
How Much Does it Cost to Install a New Sink Drain
Replacing or installing a sink drain can be an excellent way to update your kitchen or bathroom without spending a fortune. However, before you start the project, it’s crucial to know how much it will cost.
Factors That Affect the Cost of Installing a New Sink Drain
The cost of installing a new sink drain may vary depending on the following factors:
Type of Sink Drain
There are different types of sink drains to choose from, including pop-up drains, push-button drains, and grid drains, each with varying costs.
Location
The location of the sink drain can affect the installation cost. If the sink is far from the plumbing system or challenging to access, the installation cost will be higher.
Plumbing System
The plumbing system in your house may also affect the installation cost. If the plumbing system is outdated or requires extensive repairs, the cost may go up.
Average Cost of Installing a New Sink Drain
On average, installing a new sink drain can cost anywhere from $200 to $500, depending on the factors mentioned above. However, the cost may go higher if you hire a professional plumber.
DIY vs. Professional Installation
Installing a new sink drain may seem like a simple project. However, if you’re not experienced, it’s not advisable to tackle it yourself. A professional plumber has the necessary experience, skills, and tools to install a sink drain correctly.
Although a DIY installation may seem cheaper, it can lead to costly mistakes. A professional plumber may charge more, but it’s worth the investment, as they will take care of anything that might go wrong in the future.
In conclusion, installing a new sink drain is an affordable way to update your kitchen or bathroom. While the cost may vary, it’s essential to hire a professional plumber to ensure that the installation is done correctly. Take the time to find a reputable plumber who will provide quality services at a reasonable cost.