If you’re tired of your dull and uninspiring floors, then epoxy flooring might just be the answer you’ve been looking for. Not only does epoxy flooring offer a sleek and polished look, but it’s also a practical and durable solution for both residential and commercial spaces. In this comprehensive guide, we’ll walk you through the process of installing epoxy flooring, from understanding the materials needed to the step-by-step application. So, let’s dive in and discover how you can transform your space with epoxy flooring.
How to Install Epoxy Flooring: A Whirlwind Adventure
Prep and Plan: The Calm Before the Storm
Before you dive headfirst into the world of epoxy flooring, take a moment to prepare yourself. This adventure requires careful planning and a few essential supplies. Don’t worry, we’ll guide you through the process like your trusty sidekick.
Step 1: Choose the Perfect Spot (Like Choosing the Perfect Ice Cream Flavor)
Finding the right location for your epoxy flooring is crucial. Just like picking your favorite ice cream flavor, you want a spot that brings you joy every time you step on it. Check for cracks, moisture, and uneven surfaces. Choose wisely, young grasshopper.
Step 2: Cleanse the Battlefield (Goodbye, Dust Bunnies!)
Now it’s time to clear the battlefield. Sweep away any debris, loose dirt, or pesky dust bunnies that might sabotage your flooring endeavor. Trust us, you don’t want a rogue hair or mysterious crumb ruining your epoxy masterpiece.
Step 3: Etch That Concrete (Embrace Your Inner Artist)
Etching the concrete might sound fancy, but it’s just a fancy way of saying “roughing up the surface.” You don’t need to be Picasso, just grab an etching solution and scrub away. This process helps your epoxy bond with the concrete, creating a solid foundation for your floor art.
Applying the Epoxy: Ready, Set, Action!
Now that you’ve completed the prep work, it’s time to unleash your inner epoxy superhero. With your trusty sidekick supplies in hand, you’re ready to make magic happen.
Step 4: Prime Time (Enter: The Primer)
Just like a superhero wears a cape, your epoxy needs a primer. Apply it like a first coat of paint, ensuring full coverage. This mighty primer will seal your concrete and provide a strong base for your epoxy.
Step 5: Mix That Epoxy (Prepare for the Potion)
Ah, the moment of truth! Follow the instructions on your epoxy kit religiously, mixing the components together. This potion must be stirred well – no lumps allowed. Pro tip: think of it as baking cookies; the perfect combination creates the perfect result.
Step 6: Apply the Epoxy (Become a Smooth Operator)
Time to take your epoxy skills for a spin. Pour the freshly mixed epoxy onto your primed floor, working in small sections. Your goal? To spread the epoxy like a fancy pancake chef, ensuring a smooth and even finish.
The Waiting Game: Patience Is a Virtue
As the saying goes, “patience is a virtue.” So while your epoxy floor cures, take a step back and enjoy a cup of tea. Rome wasn’t built in a day, and neither is a magnificent epoxy floor. Stay calm, my friend, and let time work its magic.
Step 7: Let It Cure (Don’t Rush the Romance)
Just like a fine wine, your epoxy floor needs time to develop its unique character. Let it cure according to the manufacturer’s instructions. Avoid hopping, skipping, or channeling your inner ballerina during this delicate process. Trust the process; the result will be worth the wait.
Step 8: Embrace Your New Adventure (Show Off Your Epoxiness)
Congratulations! You’ve successfully tackled the epic journey of epoxy flooring installation. It’s time to enjoy the fruits of your labor. Marvel at the glossy finish, show it off to friends, and bask in the glory of your newly transformed space. Your epoxy adventure has reached its triumphant conclusion.
So there you have it, fearless adventurer! With a bit of planning, a splash of creativity, and a dash of patience, you’ve conquered the world of epoxy flooring installation. Prepare to walk on the clouds, my friend, for you are now a master of the epoxy realm. Go forth and enjoy your epoxiness!
Epoxy Flooring Near Me: Finding the Perfect Location
So, you’re ready to tackle the exciting project of installing epoxy flooring, but the first thing you must consider is where to find the best epoxy flooring near you. Fear not, dear reader, for I am here to guide you through the process with a sprinkle of humor and a dash of wit. Let’s set off on this epoxy flooring adventure together!
Local Suppliers: The Treasure Hunt Begins
The hunt for the ideal epoxy flooring installer begins in your local area. You’ll want to start by conducting a quick online search or checking out your trusty Yellow Pages (if you still have one lying around, dust it off!). Look for suppliers who specialize in epoxy flooring and make a list of potential candidates. Remember, it’s all about finding the perfect match for your flooring dreams.
Word of Mouth: Unleash the Power of Friends and Family
Next up, tap into the power of your social circle. Reach out to friends, family members, or even the chatty neighbor who always seems to know everything. Ask for recommendations or if they’ve had any personal experiences with epoxy flooring installers nearby. You might be surprised by the hidden gems of information that will guide you to the right people.
The Online Community: Embrace the Internet’s Wisdom
Ah, the internet, the cyber playground where all your questions can find an answer. Jump onto online forums, social media groups, and websites dedicated to flooring enthusiasts. Engage in conversations, ask questions, and seek advice from those who have already ventured into the epoxy flooring world. You might stumble upon some fantastic recommendations that will lead you straight to the epoxy flooring oasis you’ve been searching for.
Location, Location, Location: Convenience Matters
When looking for epoxy flooring installers near you, keep convenience in mind. Consider the distance from your home or workplace – after all, nobody wants to drive for hours on end to get their floor coated with epoxy. Look for local installers who are just a hop, skip, and a jump away. The shorter the distance, the easier it will be to coordinate and supervise the installation process.
Reviews and Ratings: The Final Verdict
Just like checking out a new restaurant on Yelp before making a reservation, scrutinize the online reviews and ratings of your potential epoxy flooring installers. Dive deep into the comments section and see what previous customers have to say. Look for installers with consistent positive ratings and glowing reviews. Remember, customer satisfaction speaks volumes about the quality of the workmanship.
So, my fellow epoxy enthusiasts, with these tips in your pocket, you’re well on your way to finding the perfect epoxy flooring installer near you. Remember, this quest shouldn’t be a burden; it should be an adventure filled with excitement and anticipation. Happy epoxy flooring hunting!
Epoxy Flooring for Homes: A Fun and Durable Option
So, you’ve decided to give your home a makeover, and you’re considering epoxy flooring. Well, my friend, you’ve come to the right place! Let’s dive into the world of epoxy flooring for homes and discover why it’s not just a practical choice, but also an opportunity to unleash your creative genius.
Why Choose Epoxy Flooring
First things first, let’s talk about why epoxy flooring is worth considering. When it comes to durability, epoxy takes the cake. It’s like the superhero of floors, able to withstand heavy traffic, spills, and all the messes life throws at it. Plus, it offers unmatched resistance to stains, chemicals, and even those inevitable scratches from your four-legged friends.
Be Your Own Picasso
Now, here’s where the fun begins. Epoxy flooring is not limited to a boring, one-color style. Oh no, my friend, you can unleash your inner Picasso and create a masterpiece on your very own floor. With endless color options, patterns, and even the ability to mimic textures like marble or granite, you can let your creative juices flow and make your floor a work of art. Just imagine the envy on your friends’ faces when they step into your home!
DIY or Pro
Before you channel your inner Bob Villa, it’s important to consider whether you want to take on the task yourself or leave it to the pros. Sure, DIY can save you some cash, but let’s be real, this is not your average weekend project. But hey, if you enjoy the challenge and don’t mind a bit of mess (and maybe a few mishaps), then go for it! If, on the other hand, you value your sanity and want a flawless finish, hiring a professional might be the way to go.
A Word of Advice
Now, my friend, let me offer you a few words of wisdom. Prep work is key in achieving a long-lasting and glossy finish. Make sure your floor is clean, dry, and any cracks or imperfections are properly repaired before you even think about applying that epoxy. And speaking of applying, follow the manufacturer’s instructions to a T. Trust me, skipping steps or improvising is never a good idea when it comes to epoxy flooring.
Let the Magic Happen
Once you’ve done your prep work and you’re ready to dive into the world of epoxy, get ready for some magic. Watching that liquid turn into a mesmerizing, seamless surface is like watching a caterpillar transform into a butterfly. Okay, maybe it’s not that magical, but it’s pretty darn cool!
So there you have it, my friend. Epoxy flooring for homes is not only a practical choice but also an opportunity to let your creative side shine. Whether you’re going the DIY route or hiring a pro, just remember to prep, follow instructions, and enjoy the mesmerizing transformation of your floor. It’s time to turn your home into the envy of the neighborhood!
Epoxy Flooring Process: A Playful Journey from Start to Finish!
Introduction
Hey there! So, you’ve decided to take the plunge and install epoxy flooring in your space? Good for you! This trendy flooring option not only offers durability but also adds a touch of style. But hold on a second, before you dive headfirst into the epoxy sea, let’s take a look at the epoxy flooring process. In this section, we’ll explore the process step by step, but don’t worry, we’ll keep it light and fun!
Step 1: Preparing the Surface
Okay, let’s get this show on the road! The first step in the epoxy flooring process is all about preparation. Think of it like prepping for a big feast. You’ll want to clean and prepare your surface as if you’re hosting a fancy dinner party. Sweep away any debris, scrub away the stains, and say goodbye to those pesky oil spots. Remember, cleanliness is key here!
Step 2: Patching and Repairing
Now that your surface is sparkly clean, it’s time for some patching and repairing, just like fixing up that old pair of jeans! Fill in any cracks or chips using an appropriate epoxy filler. Smooth it out like a pro and get ready to show off your repair skills. Once you’re done, your floor will look as good as new!
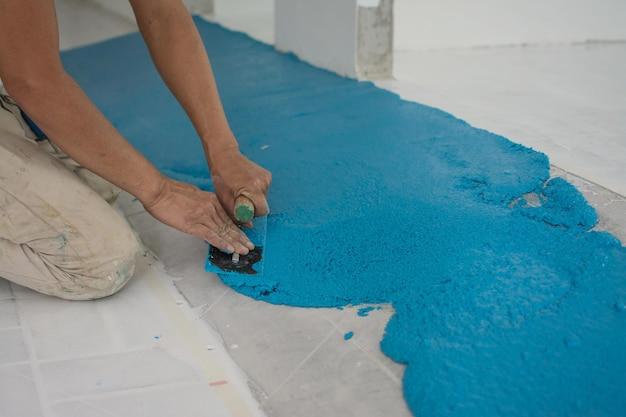
Step 3: Applying the Epoxy
Congratulations, you’ve made it to the main event! It’s time to apply that gorgeous epoxy coating. Just like a master painter, you’ll need to mix the epoxy resin and hardener together. Follow the instructions carefully, because getting the right ratio is crucial for a successful outcome. Now, grab your roller, put on some tunes, and start coating your floor. Smooth, even strokes are the name of the game, so channel your inner Van Gogh and create a work of art!
Step 4: Letting It Cure
Patience is a virtue, my friend. Once you’ve applied the epoxy, it’s time to let it cure. This is the waiting game, but trust me, it’ll be worth it! Find something to keep yourself occupied because the epoxy needs time to harden and achieve its full strength. So sit back, relax, and let the magic happen.
Step 5: The Finishing Touches
Congratulations, you’ve reached the final step! It’s time to add those finishing touches and make your floor shine brighter than the sun. Apply a clear topcoat to protect your epoxy masterpiece and give it that glossy, polished look. And voila, you’re done! Step back and admire your epoxy flooring triumph!
And there you have it, folks! The epoxy flooring process in a nutshell. From prepping and patching to applying and curing, it’s been quite the adventure. But hey, all great adventures have challenges, right? So, roll up your sleeves, follow these steps, and get ready to enjoy the beauty and durability of your brand-new epoxy floor. Happy flooring!
Epoxy Flooring Materials: What You’ll Need
The Essentials
When it comes to installing epoxy flooring, you’ll want to gather a few key materials to ensure a successful project. Here’s a rundown of what you’ll need:
1. Epoxy Resin & Hardener
Just like Batman needs Robin, epoxy resin needs its hardener sidekick. These two components work together to create the magic that gives epoxy flooring its durability and strength. Make sure to choose a high-quality resin and compatible hardener for the best results.
2. Mixing Container
To mix your epoxy resin and hardener, you’ll need a sturdy, non-reactive container. A plastic bucket or a metal can will do the trick, but whatever you choose, just make sure it’s clean and large enough to hold your desired amount of epoxy.
3. Stirring Stick

Forget about using your favorite kitchen spoon; what you need is a mixing stick specifically for epoxy. Opt for a wooden or plastic stick that you can dedicate solely to your epoxy adventures. Trust us, it’s not inviting to find dried epoxy in your cereal the next morning.
The Little Helpers
Aside from the essentials, there are a few other handy materials that will make your epoxy flooring installation process smooth sailing:
1. Paint Roller
A good quality paint roller, with a long handle and a medium-sized nap, is perfect for applying epoxy evenly and efficiently. It will help you achieve that picture-perfect finish without too much hassle. Who said you can’t be Picasso in your garage?
2. Painter’s Tape
To achieve clean and crisp edges, you’ll want to use painter’s tape to create boundaries between your epoxy floor and other surfaces, such as walls or baseboards. This extra step will ensure your project looks professional and well-executed, like a perfectly tailored tuxedo.
3. Safety Gear
Safety first, folks! Don’t forget to equip yourself with the proper protective gear. This means wearing gloves to protect your hands from sticky situations and goggles to shield your eyes from any accidental epoxy splatters. Safety is trendy, so don’t forget to rock your gear like a fashion-forward superhero.
Now that you have your materials list, it’s time to roll up your sleeves and get ready to transform your space with the enchanting power of epoxy. With the right materials in hand, your flooring project is only a few steps away from becoming a reality. So, suit up, grab your materials, and let the epoxy fun begin!
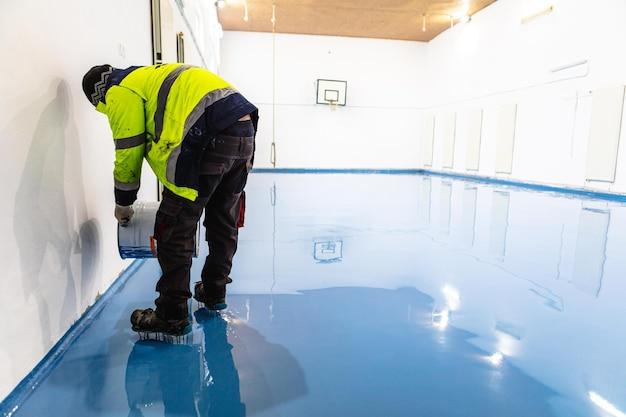
Epoxy Flooring Installation for Your Garage
So you want to upgrade your boring old garage floor into a sleek and durable epoxy masterpiece, huh? Well, you’re in luck because I’ve got just the guide for you! In this section, we’ll walk you through the step-by-step process of installing epoxy flooring in your garage. Get ready to turn that dull concrete into a show-stopping, finger-pointing, jealousy-inducing surface. Let’s get cracking!
Prepping is Key
Before we dive headfirst into the world of epoxy, let’s talk prepping. This is a crucial step that often gets overlooked. First, make sure your garage floor is clean and clear of any obstacles, like your old collection of classic car parts (Sorry, Tim, the ’67 Mustang can wait). Sweep away the dust and debris with gusto, my friend. Then, give it a thorough scrubbing. We’re talking soap, water, and a good ol’ elbow grease. Don’t be afraid to channel your inner Mr. Miyagi and wax on, wax off.
Patch It Up
Alright, now that your garage floor is squeaky clean, it’s time to patch up any imperfections. Fill those cracks and craters like a true epoxy Jedi. Don’t overlook even the tiniest of flaws, as they could haunt your otherwise flawless masterpiece. Smooth everything out, and let it dry completely. Patience, young grasshopper.
Prime Time
Now, this may sound like something you do in front of a TV with popcorn, but in the world of epoxy, priming is serious business. Apply a coat of epoxy primer, and let it do its magic. Not only will it create a strong bond with the concrete, but it’ll also prevent any unwanted surprises down the road. Trust me, you wouldn’t want your beautiful epoxy flooring to peel away like a bad sunburn. Ouch!
Epoxy Bonanza
It’s finally time for the main event, folks—the epoxy bonanza! Using a roller or a squeegee, apply the epoxy coating evenly across your garage floor. This is where you can let your creativity run wild. Want a sleek solid color? Go for it. Feeling adventurous and want to add some decorative chips? The world is your oyster. Just remember to follow the manufacturer’s instructions and let the epoxy cure properly. We’re not impatient here; we’re epoxy connoisseurs.
Seal the Deal
You’re almost there, my friend. But before you call it a day, don’t forget to seal the deal. Apply a clear topcoat to protect your beautiful epoxy floor from scratches, stains, and UV damage. This will ensure your garage floor stays looking brand spankin’ new for years to come. Trust me, you’ll want to show it off to everyone who steps foot in your garage.
And there you have it, folks! Your garage floor is now worthy of a glossy magazine spread. Go ahead and park your car, hang up those tools, and bask in the glory of your newly installed epoxy flooring. You’ve earned it, and you deserve it!
Now, go ahead and invite your friends over for a garage-warming party. Just make sure they wipe their feet before stepping onto your masterpiece. You wouldn’t want any tire marks to ruin your moment, would you?
So, get cracking on that epoxy flooring installation, my friend. The garage gods will be proud, and your neighbors will be green with envy.
Can I Install Epoxy Flooring Myself
So, you’ve decided to unleash your inner DIY enthusiast and take on the challenge of installing epoxy flooring yourself. Bravo! But before you embark on this exciting new adventure, let’s take a closer look at what it takes to conquer the world of epoxy flooring like a pro.
A word of caution
First things first, my eager DIY friend, it’s important to note that installing epoxy flooring is no walk in the park. This is not the time to channel your inner superhero and ignore all warnings – unless you want your epoxy floor to turn into a sticky, messy disaster. So, before you dive headfirst into the world of epoxy, consider the following:
Assessing your skills
Installing epoxy flooring requires a certain level of skill and expertise. If your previous DIY projects have been limited to assembling IKEA furniture or painting a feature wall, you might want to think twice before taking on epoxy flooring. Not to deter you, but it’s always good to be realistic about your abilities and comfort level with more complex tasks.
Time is of the essence
Patience, my dear DIY friend, is an absolute necessity when it comes to installing epoxy flooring. This is not the kind of project you can knock out in a weekend (unless you possess supernatural powers, in which case, please teach us your ways!). Properly preparing and applying epoxy takes time, and rushing through the process will only result in disappointment. So, if you’re a bit of a time-crunched individual, it might be wise to enlist the help of professionals.
The devil is in the details
Attention to detail is key when it comes to epoxy flooring. From properly cleaning and preparing the surface to mixing and applying the epoxy, every step is crucial. So, if you’re the type of person who tends to skim read instructions or skip steps in a recipe, then maybe this DIY project isn’t the best fit for you. But hey, I’m not judging! We all have our quirks.
The verdict
So, can you install epoxy flooring yourself? Absolutely! With the right amount of research, preparation, and patience, you can conquer the art of epoxy flooring like the DIY pro that you are. However, it’s important to evaluate your skills, consider the time commitment, and embrace your inner detail-oriented self before diving in. And remember, if all else fails, there’s no shame in calling in the professionals. After all, we can’t all be DIY superheroes…or can we?
Disadvantages of Epoxy Flooring
It’s Not a DIY Project
Installing epoxy flooring may sound easy, but trust me, it’s not your average DIY project. Unless you happen to be a professional flooring expert, you might end up with a messy disaster on your hands. So, unless you fancy playing the role of a not-so-artistic Picasso with a paint roller, it’s best to leave this task to the pros.
The Smell Might Make You Gag
Okay, let’s talk about the smell. Picture this: you’ve just finished applying the epoxy coating to your floor, and the stench hits you like a punch to the face. That potent chemical smell can linger for days, even weeks, and it’s not exactly the kind of scent you want to showcase to your guests. Better stock up on air fresheners and hold your breath until it fades away.
It’s Not Scratch-Proof
While epoxy flooring is durable and resilient, it’s not invincible. Those gorgeous glossy surfaces that seem so perfect can be prone to scratches and dents. So, if you decide to dance the night away in your stilettos or let your pet tigers roam free, expect some scratches to appear. Even though epoxy can handle a lot, it can’t handle everything.
Prepare for Slippery Slopes
You might feel like Tarzan swinging from a vine on your smooth epoxy floors, but be careful – it’s not all fun and games. Epoxy flooring can become quite slippery, especially when wet. So, unless you want to do a floor routine that rivals a figure skater’s performance every time you walk on it, you might want to reconsider in areas prone to spills or high foot traffic.
It’s Not a Miracle for Damaged Floors
If your floor has significant damage or cracks, applying epoxy won’t magically fix it. Epoxy coatings aren’t a cure-all solution for floor problems. They can cover up minor imperfections, but major repairs are a different ball game. So, don’t expect epoxy to work miracles – it’s not a superhero, despite its shiny appearance.
Say Goodbye to Natural Light
Epoxy flooring can make your space look sleek and sophisticated, but it comes with a trade-off. Once you lay down that glossy layer, say goodbye to the beauty of natural light bouncing off your floor. Epoxy has a way of absorbing light rather than reflecting it, so your space may feel a tad darker than before. Time to invest in some extra lamps!
In conclusion, epoxy flooring may have its advantages, but it also has its fair share of disadvantages. From the challenge of installation to the lingering smell, the potential for scratches, slippery surfaces, and limited ability to fix major floor issues, it’s essential to weigh the pros and cons before diving into this flooring adventure. But hey, at least your floors will look shiny and impressive – just keep those stiletto heels in check!
How to Apply Epoxy Flooring
Preparing for the Epoxy Adventure
So, you’ve made the brave decision to embark upon the thrilling journey of applying epoxy flooring. Buckle up, my friend, because we’re about to dive into the exciting world of epoxy application. But first, let’s make sure we have everything we need. Grab your trusty safety goggles, gloves, and a mask. After all, we’re about to get real up close and personal with some chemical magic.
Step 1: The Surface Games
Before we can unleash the epoxy fury, we need to ensure our surface is ready for action. This means giving it a thorough cleaning and a gentle sanding, just like a day at the spa for your floor. Say goodbye to any dirt, grime, or imperfections. We want our surface to be as smooth and pristine as a freshly polished pair of shoes.
Step 2: It’s Time to Mix Things Up
Now comes the fun part. Prepare your epoxy mixture by following the manufacturer’s instructions. This isn’t a time for guesswork, my friend. We’re not baking grandma’s secret cake recipe here. We’re dealing with a scientific cocktail that requires precise measurements and a gentle hand. So, take a deep breath, read those instructions, and channel your inner chemist.
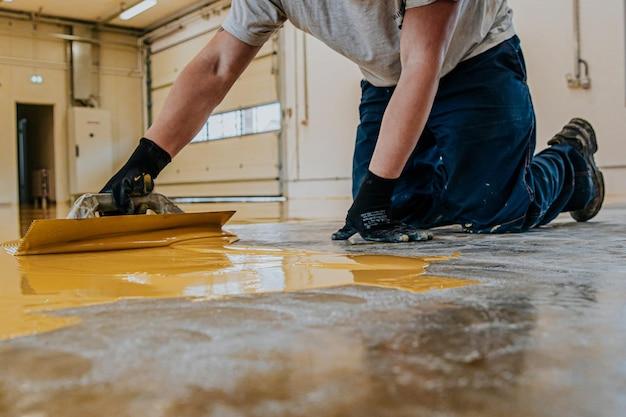
Step 3: Roll Out the Magic Carpet… of Epoxy
With your surface spick and span and your epoxy mix ready to rock, it’s time to get rolling. Literally. Grab your trusty paint roller and dip it into the heavenly elixir of epoxy. Start at one corner of the room and work your way across in smooth, even strokes. Think of it as if you’re painting a masterpiece on canvas, except this time, your canvas is the floor.
Step 4: Say Goodbye to Air Bubbles
Ah, air bubbles. The sneaky little creatures that can wreak havoc on your beautifully coated floor. Don’t worry, though. We have a secret weapon against them – it’s called a bubble-busting roller. Gently go over your freshly applied epoxy with this special roller to pop those pesky air bubbles like the satisfying sound of bubble wrap.
Step 5: The Waiting Game
Now, my friend, you must exercise your greatest virtue – patience. Give your epoxy floor ample time to dry and cure. This could take anywhere from a few hours to a couple of days, depending on the specific product you’re using. Use this time to catch up on your favorite Netflix show, read a book, or plan your victory dance for when the floor is finally ready.
Step 6: Revel in the Glory of Your Epoxy Triumph
Congratulations, you magnificent epoxy artist! You’ve successfully navigated the treacherous path of epoxy application and emerged victorious. Take a moment to admire your gleaming, durable, and oh-so-stunning epoxy floor. You’ll forever be the talk of the town, the envy of your neighbors, and the proud reciter of epoxy tales.
And there you have it, my fellow epoxy explorer. You now have the knowledge and courage to dive headfirst into the world of epoxy flooring. So gather your supplies, don your protective gear, and let the epoxy magic begin! May your floor shine bright and your steps be bouncy and epoxy-coated. Happy flooring!
Epoxy Flooring Installation Cost
So, you’ve decided to revamp your floor with a shiny new epoxy coating? Great choice! But before you dive headfirst into this exciting project, let’s talk about the not-so-glamorous part: the cost. Don’t worry; we’ve got the inside scoop on all things epoxy flooring installation cost.
Material Prices: Not More Than Your Morning Latte!
First things first, let’s talk about the materials you’ll need. Epoxy flooring, like a superhero cape for your floors, comes with a range of options. Depending on the type of epoxy and your flooring size, the cost of materials can vary. But fear not, epoxy warriors! On average, for a standard-sized room, you can expect the cost of materials to be somewhere in the range of your daily latte fix. So, putting some sparkle on your floor won’t break the bank!
Labor Costs: DIY or Call in the Pros
Now, here’s where things get interesting, my fellow floor warriors. You have two choices: DIY or call in the pros. If you’re feeling adventurous and have some handyman skills up your sleeve, you can tackle the project yourself. It’s like an extreme home makeover, but for your floors! However, if you’d rather sit back and relax while someone else takes care of business, professional installation is the way to go.
DIY can save you some bucks, but remember, it’s not as easy as pie! Warning: potential pitfalls ahead – random bubbles, uneven coating, or even ending up with an epoxy-coated dog instead of a shiny floor (just kidding, but be careful!). Hiring a professional ensures a smooth and flawless finish, but it comes at a higher cost. So, choose your floor-fate wisely!
Hidden Costs: Surprises Underneath the Surface
As the saying goes, “It’s what’s inside that counts.” Unfortunately, that rings true for your floor as well. Hidden costs may lurk beneath that innocent-looking carpet or old flooring. Moisture damage, cracks, or uneven surfaces might need some TLC before the magic of epoxy can be unleashed. Cue dramatic music. Don’t fret though! A professional evaluation can save you from any unexpected surprises and help you plan your budget accordingly.
The Verdict: Worth Every Penny
Now that we’ve spilled the beans on epoxy flooring installation costs, you might be wondering if it’s worth it. Our answer? Absolutely! Epoxy flooring offers a durable, low-maintenance, and stunning finish that can transform any space into a jaw-dropping masterpiece. Whether you decide to go the DIY route or hire a pro, the cost is a small investment compared to the long-term benefits of having a floor that will make your neighbors green with envy.
So, gear up and get ready to embark on your epoxy flooring adventure. Your wallet won’t hate you, and your floors will thank you for the royal treatment. It’s time to say goodbye to boring floors and embrace a floor that’s as tough as it is mesmerizing.
In the words of epoxy enthusiasts everywhere: “May your floors be flawless and your pockets stay happy!”
Is Epoxy Flooring Easy to Install
Let’s Dive into the Epox(y)idence!
If you’re considering a home renovation, or you’ve just had enough of your dull and boring concrete floors, then epoxy flooring might be the perfect solution for you. But one burning question remains: Is epoxy flooring easy to install? Fear not, because we’re about to break it down for you in the most casual and humorous way possible!
The Myth-Busting Begins!
You might have heard horror stories of people attempting to install epoxy flooring, only to end up with a sticky mess or a patchwork of mismatched colors. But let’s get one thing straight – those are the tales of the inexperienced and unprepared. With proper guidance and a sprinkle of common sense, epoxy flooring can actually be a pretty straightforward DIY project.
Prep Work – The “Not So Secret” Ingredient
As with any successful project, preparation is key. Before diving headfirst into the world of epoxy, make sure your floors are clean, dry, and free from any dirt or oil. This might involve some light scrubbing and maybe even a bit of elbow grease, but hey, it’s called “prep work” for a reason!
Time to Get Your Hands Dirty… With Style!
Mixing epoxy components may sound like a complex equation, but fear not, Einstein! It’s actually a simple process of combining the resin and hardener in the correct ratios. Just follow the instructions provided by your chosen epoxy brand, and voila! You’ll have a magical concoction ready to transform your floors into a work of art.
Smooth Operator – Spreading the Love
Now comes the fun part – pouring and spreading the epoxy mixture onto your floors. Grab yourself a trusty roller and get ready to channel your inner Picasso. Start from the outer edges and work your way inward, making sure to achieve an even and smooth layer. It’s a bit like spreading frosting on a cake, except this cake is way more durable and long-lasting.
Patience Is a Virtue – Curing Takes Time
Once your floors are covered in epoxy goodness, it’s time to sit back, relax, and let the magic happen. Curing time can vary depending on the specific epoxy brand, but generally, you’ll need to exercise a little patience and give it some time to dry. It might be tempting to test your floors with a daring tap dance routine, but trust us – restraint is key here.
The Final Reveal – Behold Your Masterpiece!
When the curing process is complete, it’s time to sit back and admire your handiwork. Marvel at the sleek and glossy finish, and revel in the fact that you’ve just become a certified epoxy flooring pro. You can now proudly strut across your brand-new floors, knowing that you’ve achieved something truly amazing.
So, is epoxy flooring easy to install? Absolutely! With a bit of preparation, a sprinkle of creativity, and a dash of patience, anyone can transform their floors into a masterpiece. So go on, unleash your inner DIY guru, and let the epoxy magic begin!
How to Do Epoxy Flooring Step by Step
So, you’ve decided to take the leap and try your hand at installing epoxy flooring. Congratulations! It can be a fun and rewarding DIY project, as long as you know what you’re doing. Don’t worry, though; I’m here to guide you through the process step by step. Let’s get started, shall we?
Step 1: Clear the Space and Prep Like a Pro
First things first, you’ll want to clear the area you’ll be working in. Remove any furniture, rugs, or other items that might get in the way. Don’t forget to give the floor a good cleaning, too. Sweep away any dirt or dust and then mop it up to ensure a clean and smooth surface for your epoxy magic.
Step 2: Get Your Tools and Materials Ready
Now that the space is all prepped, it’s time to gather your supplies. Here’s what you’ll need:
- Epoxy flooring kit (including epoxy resin and hardener)
- Protective gear (gloves, goggles, and a mask)
- Mixing tools (a large bucket and a drill with a mixing attachment)
- Paint roller with a long handle
- Paintbrush
- Floor cleaner or degreaser
- Crack filler (if needed)
- Sandpaper or a diamond grinder (to roughen the surface)
- Painter’s tape (for a clean finish)
Step 3: Patch It Up and Rough It Up
If there are any cracks or imperfections in your floor, now’s the time to fill them in with a crack filler. Once that’s done, you’ll want to roughen up the surface using sandpaper or a diamond grinder. This step is crucial for allowing the epoxy to bond properly with the floor. Plus, it’ll make you feel like a true DIY warrior!
Step 4: Mix, Mix, Mix
Now comes the fun part – mixing the epoxy resin and hardener. Make sure to follow the instructions on your kit carefully. Once everything is mixed together, you’ll need to let it sit for a few minutes to allow any air bubbles to pop. Trust me, you don’t want those pesky bubbles ruining your masterpiece!
Step 5: Roll and Brush Like a Pro
Time to get hands-on with that epoxy goodness! Start by cutting in around the edges of the room using your paintbrush. Then, grab your trusty paint roller and start applying the epoxy in smooth, even strokes. Work your way from one end of the room to the other, making sure to keep a wet edge to avoid any weird lines or unevenness. Remember, a little patience goes a long way!
Step 6: Let It Dry and Admire Your Handiwork
Once you’ve finished applying the epoxy, it’s time to sit back, relax, and let it dry. Follow the manufacturer’s instructions for the drying time, but be prepared to wait at least a day or two before walking on it. Trust me, it’ll be worth it when you see that shiny, polished finish that will make all your friends jealous!
Now that you’ve conquered the art of epoxy flooring, you can proudly call yourself a DIY extraordinaire. Go ahead and plan your next project – just remember to have fun, take your time, and enjoy the process. Happy epoxy-ing!