Are you considering a van roof replacement to upgrade the living space of your beloved van? If yes, then you’ve come to the right place. This blog post is designed to provide you with all the necessary information you need to make an informed decision about your van’s roof replacement. Whether your van is leaking or you’re simply looking to improve its appearance, you’ll find all the answers you need here.
From DIY van roof raise and van high top conversion kits to dry van roof replacement cost and fiberglass van roof extensions, we’ve got it all covered. We’ll even show you how to raise the roof on your van in easy-to-follow steps.
Are you wondering “What is the MOA roof extension?” or “How much does a van topper cost?” We’ll explore these questions and many more in this guide.
If you’re looking for used fiberglass van tops for sale or need to seal screw holes in your van’s roof, we’ll offer tips and tricks to get the job done right.
So, if you’re ready to learn everything there is to know about van roof replacement, let’s dive in and explore the world of van living!
Van Roof Replacement: How to Know When to Replace Your Van’s Roof
If you own a van, you know how important it is to keep it in good condition. One of the most critical aspects of van maintenance is keeping an eye on the roof. A damaged or worn-out roof not only puts your van at risk but also endangers you and your passengers. In this section, we’ll discuss everything you need to know about van roof replacement, including signs that your van roof needs replacing, types of roofs, costs, and more.
Signs that your van roof needs replacing
- Leaks and water damage: One of the most common signs of a damaged roof is leaks. If you notice water entering your van, your roof may have cracks, holes, or worn-out seals. Leaks can cause further damage to your van’s interior, leading to mold and mildew growth, rust, and corrosion.
- Visible damage: Take a look at your van’s roof and search for any visible damage such as dents, cracks, or punctures. These can lead to further damage and should be addressed before they escalate.
- Sagging roof: An overly sagging roof is another sign that you may need a van roof replacement. A sagging roof indicates that the structure is compromised and needs to be replaced.
- Age: If your van is over ten years old, it may be time for a roof replacement. Even if you don’t see any visible damage, the roof’s wear and tear may have taken its toll.
Types of roofs
Before replacing your van roof, it’s important to understand the different types of roofs available in the market.
- Fiberglass: Fiberglass roofing is made up of layers of fiberglass sheets and resin. It’s a durable and lightweight option that’s also waterproof.
- Metal: Metal roofs are made up of aluminum or steel and can withstand harsh weather conditions. They’re also lightweight and resist rust and corrosion.
- Rubber: Rubber roofs are made of synthetic rubber and are popular among van owners. They’re waterproof and easy to install.
Cost of van roof replacement
The cost of van roof replacement varies depending on the roof type, size of the van, and labor costs. On average, a van roof replacement can cost anywhere between $2,000 and $6,000.
DIY or hire a professional
Replacing a van roof can be a daunting task, and it’s recommended to hire a professional. Although DIY options are available, it’s essential to ensure the quality of the work and your safety and that of passengers. Additionally, a professional can safely remove the old roof and install a new one.
A well-maintained van is essential for ensuring safety and the longevity of your vehicle. By knowing the signs of a damaged roof, understanding the types available, and hiring a professional, you can ensure your van remains in top condition. Don’t wait until it’s too late; invest in a van roof replacement today!
DIY Van Roof Raise
If you’re an adventurous soul and want to customize your van’s roof without spending a lot of money, then a DIY van roof raise is a perfect solution for you. It can be pretty challenging and time-consuming, but it’s an excellent opportunity to enhance your van’s functionality and give it a unique look.
Materials Needed
To get started with a DIY van roof raise, you will need:
- Saw
- Drill
- Screwdriver
- Measuring tape
- Rivet gun
- Jigsaw
- Wood glue
- 2×4 planks for framing
- Plywood for sheathing
- Insulation
- Roofing material
- Wrench
Step-by-Step Guide
Follow these steps to create your DIY van roof raise:
Step 1: Remove the Existing Roof
Firstly, remove the existing roof of your van by cutting around the edges with a saw. This may take some time, so be sure to be patient and follow the lines precisely to avoid damaging the van.
Step 2: Create a New Frame
After removing the old roof, create a new frame using 2×4 planks, which will support the higher roof design. Ensure that the frame is the right size by measuring the van’s dimensions.
Step 3: Cut the Plywood
Next, cut the plywood, which will serve as a sheathing material for the new roof. Cut it to the exact size of your van’s roof to ensure a perfect fit.
Step 4: Install Insulation
Install insulation between the van’s metal frame and the plywood to keep your van warm during winter and cool during summer.
Step 5: Attach the Roofing Material
Attach the roofing material, usually aluminum or fiberglass, to the plywood using a rivet gun. Ensure it’s attached correctly and sealed off to avoid leaks.
Step 6: Finishing Touches
Add finishing touches like trim or gutter to enhance your roof’s look and functionality.
Pros and Cons of DIY Van Roof Raise
Before embarking on a DIY van roof raise, here are some pros and cons to consider:
Pros
- Affordable
- Customizable
- Unique design
- Adds more space to your van
Cons
- Time-consuming
- Challenging project
- Not suitable for beginners
- Mayvoid van warranty if not done correctly
A DIY van roof raise is an excellent way to customize your van and add more space without breaking the bank. However, it’s a challenging and time-consuming project that requires a considerable amount of effort and technical skills. If you’re up for the challenge, then a DIY van roof raise is worth considering. Be sure to do your research, plan accordingly, and follow the steps carefully to achieve the best results.
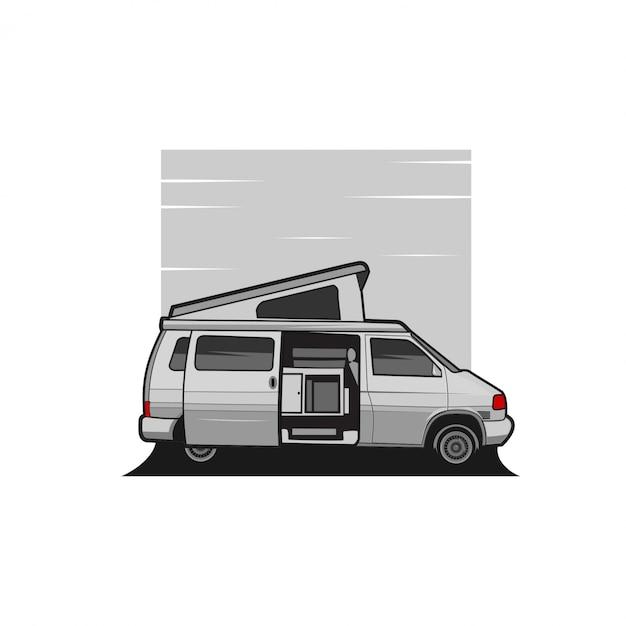
Van High Top Conversion Kit
If you’re looking for a way to increase the headroom in your van, a van high top conversion kit is an excellent solution. In this section, we’ll cover everything you need to know about van high top conversion kits.
What is a Van High Top Conversion Kit
A van high top conversion kit is a kit that allows you to add additional headroom to your van by installing a raised roof. The kit typically includes everything you need to complete the installation, such as a new roof, support braces, and hardware.
Why Choose a Van High Top Conversion Kit
There are several reasons why you might want to install a van high top conversion kit:
- More headroom: If you’re tall or need extra headroom for standing or sleeping, a high top conversion kit is an excellent solution.
- More living space: By adding height to your van, you can increase the living space and create more storage areas.
- Better insulation: A high top roof can help to provide better insulation and reduce heating and cooling costs.
- Enhanced comfort: A high top roof can make your van feel more spacious and comfortable.
How Much Does a Van High Top Conversion Kit Cost
The cost of a van high top conversion kit will depend on several factors, such as the type of vehicle you have, the materials used, and the complexity of the installation. On average, you can expect to pay between $3,000 and $6,000 for a high top conversion kit.
How to Choose the Right Van High Top Conversion Kit
When choosing a high top conversion kit, consider the following:
- Compatibility: Make sure the kit is compatible with your van’s make and model.
- Quality: Look for a kit made from high-quality materials that are durable and long-lasting.
- Installation: Choose a kit that comes with easy-to-follow instructions and includes all the necessary hardware.
DIY vs. Professional Installation
While you can install a van high top conversion kit yourself, it’s typically a complex and time-consuming process. If you’re not confident in your DIY skills, it’s best to hire a professional to do the installation for you. A professional installer will have the expertise and tools needed to complete the job correctly and efficiently.
A van high top conversion kit is an excellent way to increase the headroom and living space in your van. By choosing the right kit and installation method, you can create a more comfortable and functional living space on the road.
Dry Van Roof Replacement Cost
One of the things to consider before embarking on a dry van roof replacement is the cost. Replacing the roof of a dry van can be an expensive proposition, but it is often necessary to keep your cargo safe and dry. Here are some factors that may affect the cost of dry van roof replacement:
Materials
The cost of dry van roof replacement can vary depending on the type of material used. For example, a metal roof can be pricier than a traditional shingle roof.
Size of the van
The size of the van can also have a significant impact on the cost of replacing the roof. Naturally, a bigger van will require more materials and labor, which can increase the cost.
Condition of the roof
The condition of the roof can impact the cost of replacing it. A roof with severe damage may require more intensive work, which can make the repair cost higher.
Labor
Labor is another critical factor that affects the cost of roof replacement. The cost of labor varies depending on location, experience, and skill level.
Additional Costs
Besides the cost of materials and labor, there may be additional expenses to consider. For example, if the old roof needs to be removed before the new one can be installed, this may add to the cost. Additionally, any repairs or modifications to the framing beneath the roof may also inflate the budget.
Overall, the cost of dry van roof replacement can range from a few thousand dollars to tens of thousands of dollars, depending on various factors. Consider getting an estimate from a professional before making any decisions. It’s always better to be well informed and prepared rather than having surprises mid-project.
Fiberglass Van Roof Extension
When it comes to upgrading your van’s roof, installing a fiberglass extension might be a great option. Here’s what you need to know about it:
What is fiberglass van roof extension
A fiberglass van roof extension is an aftermarket roof replacement option for vans that are designed to extend the roof to create more standing room. It is light, durable, and resistant to wear and tear.
Benefits of fiberglass van roof extension:
- Adds extra headroom for standing or sleeping comfortably
- Increases storage space since it provides more vertical room
- Improves aerodynamics with a smoother shape that reduces wind resistance
- Enhances the look of the van with a seamless and sleek design
Things to consider:
- Price varies depending on the van’s model, size, and customizations
- DIY installation can be challenging and require specialized tools
- Finding a professional installer who can guarantee a leak-free roof might be challenging
- Some fiberglass materials aren’t as strong as metal, so they might crack or get damaged by heavy objects
Key takeaways:
If you’re on a budget and looking to improve your van’s headroom and storage space, a fiberglass van roof extension might be the right option. But before buying one, make sure to research extensively and compare prices and features. If you decide to install it on your own, make sure you have the required skills, tools, and patience. Alternatively, hire a professional installer who has the expertise and experience to do the job correctly.
Keep in mind that adding a fiberglass van roof extension can change the center of gravity of your van, affecting its handling. Make sure you test drive your van after the installation to identify any adjustments needed in your driving style.
Overall, a fiberglass van roof extension is an excellent investment that can transform your van into a comfortable and spacious mobile home.
How to Raise the Roof on a Van
If you’re considering van life, one of the essential things to remember is that you’ll need enough headroom to stand and move around in your van comfortably. However, not every van comes with the perfect amount of headroom you need, especially if you’re tall. But there’s no need to worry because, in this article, we’ll guide you through how to raise the roof on a van.
Understanding the Process
Before we begin, it’s essential to know that raising a roof on a van requires a certain level of skill and experience. While there are DIY tutorials available online, it’s not for everyone. In most cases, we recommend seeking professional help or consulting a professional conversion company that specializes in van conversions. However, if you’re confident enough to take on this project, here are the essential steps:
1. Remove the Existing Roof
The first step is to remove the existing roof of your van. This process can be time-consuming, so make sure you have enough time and the right tools to complete it. Here’s how you can do it:
- Cut the roof along the edges, including the corners.
- Use a pry bar to remove the roof from the frame.
- Remove any remaining screws or rivets, and remove the wiring and insulation.
2. Clean the Frame
After removing the roof, clean the frame with a wire brush and sandpaper. This step is essential to ensure the new roof adheres to the frame.
3. Install the New Roof
Once the frame is clean, you can now install the new roof. Here’s how to do it:
- Cut and install the new roof to the frame.
- Secure the roof with screws or rivets.
- Apply sealant to the edges and seams to prevent leaks.
4. Add Insulation and Wiring
After installing the new roof, add insulation to keep the van warm during colder seasons. You can use fiberglass insulation or spray foam insulation. Additionally, wire the van with electrical components and install lighting fixtures.
Overall, raising the roof on a van can significantly increase the headroom, making van life more comfortable. However, while it’s possible to do it yourself, it’s essential to have the right tools and expertise to avoid any mistakes. If you decide to go through with this project, remember to prioritize safety and seek professional help whenever you need it.
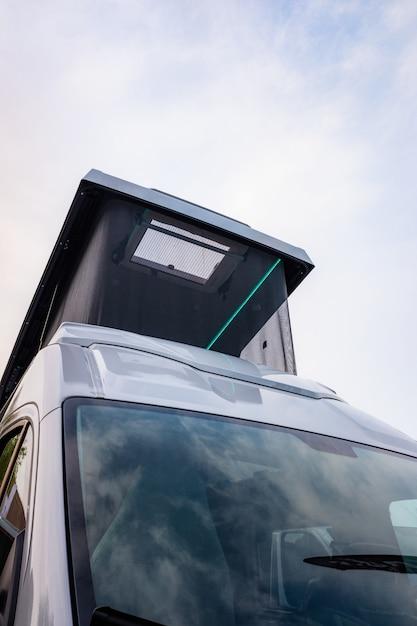
What is the MOA Roof Extension
If you’re looking to add more headroom or interior space to your van, the MOA roof extension might be the perfect solution for you. Here’s everything you need to know about this popular van modification:
What is the MOA Roof Extension
The MOA roof extension is a type of van roof replacement that involves adding a fiberglass or aluminum shell to the top of your van. This shell extends the height of your van and provides additional interior space and headroom, making it easier to stand up inside your vehicle and move around comfortably.
How Does It Work
The MOA roof extension is typically installed by a professional van conversion company. The first step is to remove your van’s existing roof and assess the structural integrity of the vehicle. Once the old roof is removed, the new fiberglass or aluminum shell is installed and sealed to prevent any leaks.
What are the Benefits of an MOA Roof Extension
There are several benefits to adding an MOA roof extension to your van, including:
-
More Headroom: With the added height of the roof, you’ll be able to stand up inside your van without hitting your head on the ceiling. This is especially important if you plan on spending a lot of time in your van or using it as a mobile workspace.
-
More Interior Space: The added height of the roof also provides more interior space, making it easier to move around inside your van and store essential gear and equipment.
-


Improved Ventilation: The MOA roof extension typically comes with built-in vents or windows, allowing for improved ventilation and airflow within your van.
-
Customization Options: Depending on the company you choose, you may have the option to customize your MOA roof extension with features like solar panels, skylights, or a roof rack for additional storage.

How Much Does an MOA Roof Extension Cost
The cost of an MOA roof extension varies depending on the size of your van, the type of material you choose, and the features you want to add. On average, you can expect to pay anywhere from $5,000 to $10,000 for this type of van modification.
If you’re looking to add more space and headroom to your van, the MOA roof extension is a great option to consider. With its added height, improved ventilation, and customization options, it’s no wonder why this modification is becoming increasingly popular among van enthusiasts. So, why not give your van a makeover and enjoy the benefits of a more spacious and comfortable mobile home?
How Much Does a Van Topper Cost
If you’re looking to add extra storage or living space to your van, a topper could be the perfect solution. But before you go out and buy one, you’re probably wondering: how much does a van topper cost? Well, the answer is not straightforward, as the price of a van topper depends on various factors. Here’s what you need to know:
Quality
The quality of the topper affects its price. Generally, the better the quality, the higher the cost. A high-quality topper will be durable, weather-resistant, and made from sturdy materials. In contrast, a cheaper topper may not offer the same level of protection or may not last as long.
Type
There are different types of van toppers, each with a unique design and function. The cost of the topper will depend on the type you choose. Here are some common types:
- Fiberglass toppers: These are the most expensive, but they’re also the most durable and offer the most protection against the elements.
- Aluminum toppers: These are lighter and more affordable than fiberglass toppers, but they’re not as durable.
- Canvas toppers: These are the most affordable, but they’re not as weather-resistant as other types.
Size
The size of your van will affect the price of the topper. A larger van will need a bigger topper, which will be more expensive. Make sure to measure your van before buying a topper, so you know what size to look for.
Brand
The brand of the topper can also affect the price. Some brands are more expensive than others, but they may offer more features or higher quality materials.
Installation
Finally, don’t forget to factor in the cost of installation. If you’re handy and can install the topper yourself, you’ll save money. But if you need a professional to install it, that will add to the overall cost.
Key Takeaways
- The cost of a van topper depends on factors like quality, type, size, brand, and installation.
- Fiberglass toppers are the most expensive and durable, while canvas toppers are the most affordable but less weather-resistant.
- Make sure to measure your van and factor in the cost of installation before buying a topper.
Can You Add a High Top to a Van
If you are trying to convert your van for living or traveling, then you must have heard of high tops. A high top is an addition to a van that increases its headroom, allowing you to stand and move around comfortably inside. But what if you already have a van without a high top? Can you add one to your van?
The short answer is yes, you can add a high top to your van. However, there are a few things you need to consider before you go ahead with the installation process. Here are some essential things to keep in mind when adding a high top to your van:
Determine the Type of High Top You Want
There are different types of high tops that you can install on your van. The most popular options are fibreglass, canvas, and metal. Each has its pros and cons, and you need to choose the one that suits your needs and budget. Fibreglass tops are the most durable, canvas tops are the most affordable, while metal tops are the most customizable.
Decide Whether You Want to DIY or Hire a Professional
Adding a high top to a van is a complex process that requires specialized skills and tools. While you can do it yourself, it’s not recommended unless you have prior experience in such projects. Hiring a professional is the best option, especially if you want to ensure a quality installation. Make sure you choose a reputable and experienced installer who can handle your specific van type and requirements.
Consider the Clearance Height
Adding a high top to your van increases its height, which may limit your clearance when driving. You need to measure your new van height and ensure it doesn’t exceed the legal limits in your state or country. Exceeding the limit can lead to fines, or worse, accidents.
Factor in the Additional Weight
A high top adds weight to your van, which may affect its performance, especially if you have a smaller engine. You need to factor in the additional weight and its effects on your van’s gas mileage, stability, and handling. You may need to upgrade your suspension or engine to accommodate the new weight.
Calculate the Cost
Adding a high top to your van is a significant investment that requires careful budgeting. The cost varies depending on the type of top you choose, the van model, and the installer’s fees. You need to calculate the total cost and ensure it fits within your budget.
Adding a high top to a van is a great way to increase your headroom and make your van more comfortable. However, it’s not a decision you should take lightly. You need to consider the type of top you want, whether to DIY or hire a professional, clearance height, weight, and cost. With careful planning and execution, you can install a high top that meets your needs and enhances your van’s functionality.
Used Fiberglass Van Tops for Sale
When it comes to van roof replacement, fiberglass van tops are becoming a popular choice among van enthusiasts. They offer a durable and lightweight option that can withstand the elements and add a unique look to your van. If you’re thinking about buying a used fiberglass van top, here are some things you need to consider:
Benefits of Fiberglass Van Tops
- Lightweight: Fiberglass van tops are lightweight, making them easy to install and remove if necessary.
- Customizable: Fiberglass van tops can be easily customized to fit your specific needs and requirements.
- Durable: Fiberglass van tops can withstand the elements and provide long-lasting protection for your van.
- Affordable: Used fiberglass van tops can be a cost-effective option for those on a budget.
Factors to Consider When Buying a Used Fiberglass Van Top
- Size: It’s essential to make sure you’re buying a used fiberglass van top that fits your van’s exact measurements.
- Condition: Check the overall condition of the used fiberglass van top. Look for any cracks or signs of damage that could affect its durability.
- Compatibility: Ensure that the used fiberglass van top you’re buying is compatible with your particular van model.
- Cost: Consider the cost of the used fiberglass van top, as well as any additional expenses for installation or modifications.
Where to Find Used Fiberglass Van Tops for Sale
- Online Marketplaces: Websites like eBay, Craigslist, and Facebook Marketplace often have listings for used fiberglass van tops.
- Local Dealerships: Check with local dealerships and auto shops to see if they have any used fiberglass van tops in stock.
- Van Enthusiast Forums: Joining online forums for van enthusiasts can be a great way to find used fiberglass van tops for sale, as well as connect with other van owners and share tips and advice.
Used fiberglass van tops for sale can be an excellent option for those looking for an affordable and customizable van roof replacement solution. When buying a used fiberglass van top, make sure to consider the size, condition, compatibility, and cost. By doing your research and taking the time to find the right used fiberglass van top, you can give your van a unique look while providing long-lasting protection.
How to Seal Screw Holes in a Van Roof
If you’re considering a van roof replacement, it’s essential to make sure your new roof is watertight to avoid any future leaks. One of the critical areas to focus on is how to seal screw holes in a van roof. Here is a step-by-step guide on how to get it done:
Steps to Seal Screw Holes in a Van Roof
-
Clean the area: Before starting the sealing process, ensure that the screws and holes are free from dirt, debris, and rust. Clean them with a soft cloth or brush and some soapy water and let them dry.
-
Apply sealant: Next, apply a suitable sealant around the screw hole and screw head using a sealant gun. Be generous with the amount of sealant you use, ensuring that you apply enough to cover the entire screw head and the surrounding area.
-
Spread the sealant: Using a spreading tool, spread the sealant evenly around the screw head and the surrounding area to ensure complete coverage. This step is crucial in preventing water from penetrating through the hole.
-
Let it dry: Give the sealant enough time to dry completely, as recommended by the manufacturer’s instructions. Avoid any contact with the area during the drying process.
-
Check for leaks: Give the area a test by pouring some water around the screw hole to see if any water penetrates through. If there are no leaks, you’re good to go.
Tips for Sealing Screw Holes in a Van Roof
- Use a high-quality sealant suitable for outdoor use and compatible with your van roof material.
- Try to avoid puncturing through your van roof if possible by using clamps or adhesive tapes instead of screws.
- Ensure that the screws you use are a suitable size for the holes and are rust-free.
- Avoid over-tightening the screws, as this can distort the metal and make sealing difficult.
- Regularly inspect your van roof for any signs of damage or leaks and seal any holes promptly.
In conclusion, sealing screw holes in a van roof is a simple process that can save you from future water damage. With the right materials and tools, you can do it yourself without requiring any professional help. Take your time, ensure that the area is clean and dry, and follow the above steps to ensure your van roof stays watertight.