Have you ever wondered how to protect your home’s foundation from water damage? There are multiple ways to do so, but foundation drip line installation is one of the most effective. Using a drip irrigation system, the drip line delivers water directly to the soil surrounding your home’s foundation, preventing soil desiccation and erosion.
But how much does it cost to install a foundation drip line system? Should you bury the drip line? Is it worth the investment? In this blog post, we’ll explore all of these questions and more to help you decide whether a foundation drip line system is right for your home.
One popular option is the Rain Bird foundation watering system, but there are other brands and kit options such as the Drip Monkey foundation drip line kit. Additionally, you may be wondering if drip irrigation is even good for your foundation’s health and how far the drip line should be from your home’s foundation.
We’ll cover all of this and more in this comprehensive guide to foundation drip line installation. So, let’s dive in and explore the benefits and costs of installing a foundation drip line system to keep your home’s foundation safe and stable.
Foundation Drip Line Installation: A Comprehensive Guide
If you’re looking for an effective way to protect your home’s foundation, installing a foundation drip line is a wise decision. In this subsection, we’ll discuss everything you need to know about foundation drip line installation, including how to select the right materials, how to prepare the groundwork, and the step-by-step installation process.
Materials Needed
Before you start the foundation drip line installation process, you need to gather all the necessary materials. You’ll need a trenching tool, PVC piping, couplings, elbows, and a backflow prevention device. You’ll also need a landscape fabric and gravel to cover the piping.
Ground Preparation
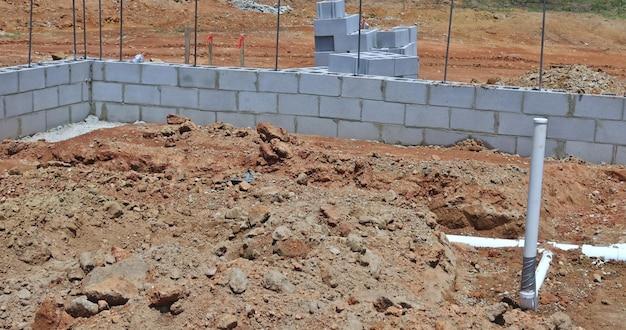
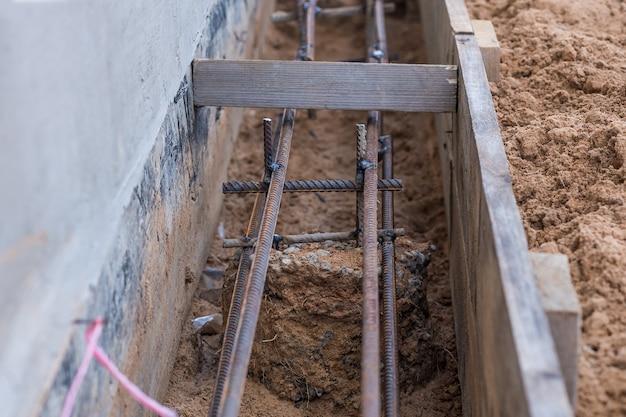
Before you can install the foundation drip line, you need to prepare the ground. You should power wash the foundation and other external surfaces of your home to remove any dirt, debris, and other contaminants that could interfere with the installation process. You should also excavate a trench around the house’s perimeter, making sure it reaches the foundation’s base.
Installation Process
Once the groundwork is complete, it’s time to begin the installation process. First, install a backflow prevention device at the water source to prevent any contaminants from entering the water supply. Then, lay out a bed of gravel at the bottom of the trench, so the PVC piping rests firmly. Next, lay the PVC piping with the drip emitters facing downwards and attach couplings and elbows as necessary. Cover the piping with another layer of gravel and wrap it with a landscape fabric to prevent soil from clogging the emitters.
In conclusion, foundation drip line installation is an excellent way to protect your home’s foundation from water damage and soil erosion. With this subheading, we hope you’ve gained a better understanding of the foundation drip line installation process and the materials you’ll need to complete the job. So, go ahead and safeguard your home for years to come.
Cost to Install Drip Line
Installing a foundation drip line is an important step to protect your home’s foundation from water damage. However, one of the first questions that homeowners have is how much does it cost to install drip line? In this subsection, we’ll discuss the different factors that can affect the cost of installation and give you a general idea of what you can expect to pay.
Materials
The cost of materials can vary depending on the type of drip line you choose. Generally, drip lines made from recycled materials tend to be less expensive than those made from new materials. Additionally, the thickness and quality of the tubing can also affect the cost. However, it’s important to choose high-quality materials that will last for years to come.
Installation Method
There are different ways to install a foundation drip line, including above ground and underground installations. An above ground installation is typically less expensive than an underground installation since there’s less digging involved. On the other hand, an underground installation is preferred by many homeowners because it’s less noticeable and can be more effective.
Size of Your Home
The size of your home will also affect the cost of installation. The larger your home is, the longer the drip line will need to be, and the more materials will be required. Additionally, the cost of installation may also be affected by the shape and layout of your home as well as the condition of your foundation.
Professional Installation
While it’s possible to install a foundation drip line by yourself, it’s often a better idea to hire a professional. Not only will they have the tools and expertise required to do the job right, but you’ll also have access to any warranties or guarantees that come with professional installation. The cost of professional installation will vary depending on the company you choose and the complexity of the job.
In conclusion, the cost to install a foundation drip line can vary widely depending on several factors, including the materials used, the installation method, the size of your home, and whether you choose to hire a professional. That said, expect to spend a few hundred to a few thousand dollars for a high-quality installation that will protect your home’s foundation from water damage for years to come.
Should I Bury My Drip Line
If you’re installing a drip line, you might be wondering whether you should bury it underground or leave it exposed. There is no one-size-fits-all answer to this question, as it largely depends on your particular setup and preferences. Here are some factors to consider that can help you decide whether to bury your drip line or not:
Aesthetics
If you care about appearances, burying your drip line might be the better option. It can provide a clean, unobtrusive look, and prevent animals from tripping over it. Exposed drip lines can be unsightly and detract from your landscape, but if you’re not too concerned about looks, you can always leave it exposed.
Maintenance
If you bury your drip line, it avoids exposure to external elements that can cause damage. For example, rodents or lawn mowers can accidentally cause damage to your drip line. However, if you ever need to make repairs or adjustments, buried drip lines can be difficult to locate and expose. If you inhabit an area that experiences frequent damage to your drip line system, burying it may be more of a hindrance than a help.
Water Preservation
If you live in an arid area with water restrictions, exposed drip lines can lose moisture through evaporation and wind exposure. In contrast, burying your drip line can minimize evaporation and preserve water. By doing so, you can have a more efficient watering system, while conserving water.
Cost
Burying your drip line can be more expensive than leaving it exposed. This is because you’ll need to rent a trencher to excavate the dirt where you’ll locate the drip line. If you’re short on budget, you can opt to leave it exposed and use some mulch around it to camouflage the line.
Ultimately, the decision to bury your drip line depends on your preferences and circumstances. Whether you decide to bury or leave your drip line exposed, keep in mind the efficiency of your watering system, the preservation of water, aesthetics, and your budget.
Foundation Drip System Cost
If you’re in the market for a foundation drip system, one of the main factors you’re likely considering is cost. While the price of a foundation drip system can vary widely based on factors such as the size of your home, the materials used, and the complexity of the installation process, we can provide some general guidelines to help you understand what to expect.
Factors that Affect the Cost of a Foundation Drip System
Before we dive into specifics, it’s important to understand that the cost of a foundation drip system can be affected by a variety of factors. Some of the most common factors that can influence the cost include:
- The size of your home
- The type of foundation
- The condition of your soil
- The type of material used for the system
- The complexity of the installation process
- The cost of labor in your area
Estimating the Cost of a Foundation Drip System
So how much should you expect to pay for a foundation drip system? While there’s no one-size-fits-all answer to this question, we can provide some general estimates.
On the low end, a basic foundation drip system for a small home might cost around a few hundred dollars, while a larger, more complex system for a larger home can cost several thousand dollars. The cost can also vary depending on the quality of the materials used. A higher quality, more durable system may cost more upfront, but it may also save you money in the long run by lasting longer and requiring less maintenance.
Additional Factors to Consider
While cost is an important factor to consider when choosing a foundation drip system, it’s not the only one. You’ll also want to consider factors such as the quality of the system, the reputation of the installation company, and the warranty that comes with the system.
To ensure that you’re getting the best value for your money, do your research and compare pricing and quality across multiple companies. With a little bit of effort, you can find a high-quality, reliable foundation drip system that fits within your budget.
Installing a Drip Line System
So, you have decided to install a drip line system, but where do you start? Don’t worry; we’ve got you covered. Here’s a simple step-by-step guide to installing a drip line system when building a foundation in your home.
Choose the Right Drip Line System
The first thing you need to do is select the right drip line system for your foundation. Drip line systems come in different shapes and sizes, and the type you choose will depend on your budget, soil type, and plant diversity. Some drip line systems are designed for uniformity, while others are created for plants that require different water amounts.
Plan Your Drip Line System
Once you have selected a drip line system, the next step is to plan out your system. You need to measure your foundation area and determine the amount of tubing, connectors, and emitters you will need. It’s essential to create a detailed layout before you start the installation process, as it will save you time and money in the long run.
Install Your Drip Line System
Now it’s time to install your drip line system. Begin the installation process by laying out your tubing and connectors, making sure that they are evenly spaced out. Connect your tubes to your water source (usually from your home’s main water line), and install the emitters every few feet.
Test Your Drip Line System
After installing your drip line system, it’s crucial to run a test to ensure it’s functioning correctly. Turn on your water, and check the pressure to verify that each emitter is distributing water evenly throughout the foundation. Check for any leaks or malfunctioning parts.
Maintain Your Drip Line System
Congratulations, you’ve successfully installed a drip line system for your foundation. To keep your system in top-notch condition, you need to maintain it properly. Schedule frequent check-ups to ensure that everything is running smoothly, replace any cracked or damaged tubing or connectors, and inspect the placement of your emitters. Don’t forget to winterize your drip line system during colder months.
That’s it! Installing a drip line system for your foundation is a smart and eco-friendly solution that can improve your home’s overall foundation health. It’s easy to install, low maintenance, and a great way to conserve water. Follow these steps, and you’ll have a successful drip line system in no time!
Rainbird Foundation Watering System
If you’re looking for an efficient watering system for your foundation, a Rainbird foundation watering system could be the ideal choice. Unlike traditional sprinklers, a foundation watering system is specially designed to water the soil surrounding the foundation of a building, which is crucial for maintaining the structural integrity of the building. A Rainbird system is an excellent option because it’s easy to install, has programmable settings, and works well in almost any weather condition. Here’s everything you need to know about the Rainbird foundation watering system.
How it Works
A Rainbird foundation watering system typically consists of a series of pipes and nozzles that are installed around the perimeter of the building. The nozzles are strategically placed to ensure that water is delivered directly to the soil surrounding the foundation. Unlike traditional sprinklers, which spray water in a circular pattern, foundation watering systems target a specific area, which helps to prevent overwatering and runoff. The system is controlled by a programmable timer, which allows you to set the watering schedule according to your needs.
Benefits of a Rainbird Foundation Watering System
One of the main benefits of a Rainbird system is that it helps to prevent soil erosion, which can lead to foundation damage. The system also helps to maintain soil moisture levels, which is essential for preventing soil contraction and expansion. Another benefit of a Rainbird foundation watering system is that it’s easy to install and requires minimal maintenance. Once the system is set up, you can rest assured that your foundation is getting the proper care it needs.
Cost
The cost of installing a Rainbird foundation watering system can vary depending on the size of your property and the complexity of the installation process. However, in general, a Rainbird system is an affordable option when compared to other foundation watering systems. Additionally, the benefits of a Rainbird system outweigh the cost in the long run because it helps to prevent costly foundation repairs.
Overall, a Rainbird foundation watering system is an excellent investment for any homeowner looking to protect their foundation. The system is easy to install and requires minimal maintenance, making it an affordable and efficient option. If you’re concerned about maintaining the structural integrity of your building, a Rainbird foundation watering system is a great way to ensure that your foundation remains healthy and strong for years to come.
Finding Reliable Foundation Drain Installers Near You
As a homeowner, finding reliable contractors for your home improvement needs can be a daunting task, especially when it comes to your foundation. One of the most critical aspects of foundation maintenance is ensuring proper installation of foundation drain systems.
A foundation drain system protects your home’s foundation from water damage by diverting water away from the foundation and into a drain field. The installation process requires a skilled foundation contractor who understands the proper techniques for installing, maintaining, and repairing foundation drains.
Fortunately, you can find dependable foundation drain installers near you through a simple Google search or a referral from friends and family. Here are some helpful tips to guide you in finding the right contractor for your foundation drain needs:
Research and Gather Information
Start by researching potential foundation drain installers in your area. Visit their websites, read their reviews, check their ratings, and go through their galleries to get a sense of their skills and experiences. You can also look for customer testimonials and feedback on third-party review sites like Yelp, Google Reviews, and Trustpilot.
Check for Licenses and Certifications
It’s essential to ensure that your contractor is licensed and certified to work in your area. Most foundation contractors hold state-issued licenses or certifications that demonstrate their training, expertise, and experience in the field. You can also ask to see their credentials and certifications to ensure they’re up-to-date.
Get Multiple Bids
Once you’ve narrowed down your list of potential foundation drain installers, reach out to them and request a bid. Make sure you get at least three bids to compare prices and services. Be wary of contractors who offer significantly lower prices than their competitors, as this may be a sign of substandard workmanship or materials.
Ask for References
A reputable foundation drain contractor should be happy to share references with you. Reach out to previous clients and ask about their experience with the contractor, the quality of their work, and whether they completed the project on time and within budget.
Trust Your Instincts
Finally, go with a foundation drain installer who you feel comfortable with and trust. It’s essential to work with a contractor who communicates well, listens to your needs, and addresses your concerns.
By following these steps, you can find a reliable and experienced foundation drain installer in your area. Remember, your home’s foundation is a crucial investment, so it’s essential to hire the right professional for the job.
Drip Monkey Foundation Drip Line Kit
Are you tired of manually watering your foundation to keep it safe and dry? Look no further than the Drip Monkey Foundation Drip Line Kit! This innovative product provides an easy and cost-effective solution to keep your foundation moisture-free all year round.
How It Works
The Drip Monkey Foundation Drip Line Kit consists of a set of drip lines that are strategically placed around the perimeter of your home’s foundation. Once installed, the drip lines distribute water evenly, preventing any moisture buildup from seeping into your foundation.
Installation
The Drip Monkey Foundation Drip Line Kit is easy to install, even for those without any plumbing experience. The kit includes all of the necessary components and step-by-step instructions to ensure smooth installation. With just a few tools and a little bit of time, you can set up your drip line kit and forget about it.
Benefits
Aside from keeping your foundation dry, the Drip Monkey Foundation Drip Line Kit also offers several other benefits. It reduces the likelihood of mold growth, prevents soil erosion, and ensures that your landscaping remains healthy and lush.
Cost-Effective
Compared to the cost of repairing a damaged foundation, investing in the Drip Monkey Foundation Drip Line Kit is a no-brainer. Not only is it cost-effective, but it also requires very little maintenance, making it a smart investment for homeowners.
If you’re looking for a hassle-free way to keep your foundation safe and dry, the Drip Monkey Foundation Drip Line Kit is the way to go. With easy installation, numerous benefits, and cost-effectiveness, it’s a practical solution that will benefit your home for years to come.
Is Drip Irrigation Good for Foundation
Drip irrigation is an efficient and effective way of watering plants because it delivers water directly to the soil where it is needed. However, is it good for your home’s foundation? Let’s take a closer look.
The Benefits of Drip Irrigation for Foundations
Drip irrigation is a type of irrigation where water is slowly and precisely delivered to plants through pipes and emitters. This method helps to control the amount of water used and reduces watering time. Drip irrigation also helps to reduce water runoff, which can be damaging to homes’ foundations.
Additionally, drip irrigation can also help maintain consistent soil moisture levels around the foundation. This contributes to the stability of the foundation and can help prevent soil shrinkage, which can lead to foundation cracks.
Factors to Consider
While drip irrigation is generally beneficial for foundations, there are some factors to consider. For example, if you have clay soil, which tends to retain water, you may need to adjust your drip irrigation system to avoid overwatering.
Another consideration is the location of your foundation. If your foundation is close to trees or other vegetation, the roots may interfere with the drip irrigation system. In this case, it may be necessary to make adjustments to the system or consider using an alternative watering method.
Drip irrigation can be a good option for maintaining a healthy foundation. However, it’s essential to take into account the specific needs of your property and foundation when deciding on an irrigation method. Overall, with proper planning and installation, drip irrigation can be a useful tool in maintaining a healthy, stable foundation.
How Far Should Drip Line be from Foundation
When it comes to installing a foundation drip line, one of the most common questions homeowners ask is how far should the drip line be from the foundation? The answer to this question will depend on a few factors, such as the type of soil, the type of foundation, and the climate.
Factors to Consider
Soil Type
The type of soil on your property can greatly affect the distance between the drip line and the foundation. If you have clay soil, it’s important to make sure the drip line is at least 6-8 inches away from the foundation. If you have sandy soil, the drip line can be closer to the foundation, usually around 4-6 inches.
Foundation Type
The type of foundation you have can also impact the distance between the drip line and the foundation. If you have a slab foundation, the drip line should be at least 6 inches away from the foundation. If you have a crawlspace or basement, the drip line can be closer, around 2-4 inches.
Climate
The climate in your area is another factor to consider when determining the distance between the drip line and the foundation. If you live in an area with heavy rainfall, it’s important to make sure the drip line is far enough away from the foundation to prevent water intrusion. On the other hand, if you live in a drought-prone area, it’s important to place the drip line closer to the foundation to ensure adequate moisture for your plants.
Overall, the distance between the drip line and foundation will vary depending on your specific property. It’s important to take into account your soil type, foundation type, and climate when determining the appropriate distance. If you’re unsure, it’s always best to consult with a professional landscaper or foundation repair specialist to ensure that your drip line is installed properly and effectively.
How long should you leave a soaker hose on for foundation
When it comes to foundation drip line installation, one of the most frequently asked questions by homeowners is how long they should leave their soaker hose on. The answer to this question is not as straightforward as you might think, as it depends on several factors.
Factors that determine how long you should run your soaker hose
- Foundation type: Different foundations have varying water absorption rates, which affects how long you should run your soaker hose. For instance, if you have a concrete or brick foundation, it will take longer to absorb water than a wood foundation.
- Soil type: The type of soil around your foundation can also affect how long you should run your soaker hose. If your soil is sandy, it will absorb water quickly and may require you to run your soaker hose for shorter periods. However, if your soil is loamy or clay-like, it will absorb water more slowly, requiring you to run your soaker hose for longer periods.
- Weather: The weather plays a vital role in determining how long you should run your soaker hose. During hot and dry weather, you may need to run your soaker hose for longer periods as the soil around your foundation will dry out faster. Conversely, during cool and wet weather, you may need to run your soaker hose for shorter periods.
Recommended time intervals for running your soaker hose
Generally, experts recommend running your soaker hose for 30 minutes to 1 hour at a time, two to three times a week. However, this is only a rough guideline, and you will still need to take into account the factors mentioned above. Start by running your soaker hose for 30 minutes, then check the soil around your foundation for moisture levels. If the soil is still dry, you can increase the time incrementally until you find a suitable duration for your specific situation.
Knowing how long to leave your soaker hose on for foundation drip line installation is crucial for maintaining the health of your foundation. However, as we’ve seen, there are several factors that determine the ideal duration, which makes it hard to give a straightforward answer. By taking into account your foundation type, soil type, and weather, you can determine a suitable time interval to run your soaker hose and keep your foundation healthy for longer.