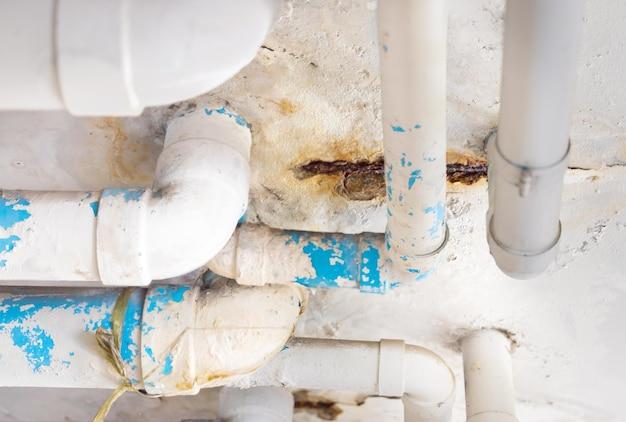
Is your vent pipe gasket causing a plumbing vent stack leak? Is the pipe on your roof leaking water and causing you sleepless nights? Or perhaps your bathroom roof vent is leaking, and you don’t know what to do? Well, you’re not alone. Plumbing vent pipe collar leaks and roof vent leak repair from inside are common issues that many homeowners face.
But worry not! In this comprehensive blog post, we’ll take you through everything you need to know about fixing a leaking vent pipe, from the causes to the most effective solutions. We’ll explore how to fix a leaking plumbing stack, why a plumbing vent pipe can leak in the attic, and what to use to seal vent pipes on the roof.
Are you ready to say goodbye to that annoying sound of dripping water and a wet ceiling? Then read on!
Plumbing Vent Pipe Leaking: Causes and Solutions
A leaking plumbing vent pipe is a common plumbing issue that can cause significant problems when not addressed promptly. In this section, we’ll explore the causes of plumbing vent pipe leaks and provide some practical solutions to the problem.
What Causes a Plumbing Vent Pipe to Leak
A plumbing vent pipe leak can occur for different reasons, and identifying the cause is essential for effective repairs. Here are some possible causes of a leaking plumbing vent pipe:
1. Cracked or Damaged Pipes
When a vent pipe is cracked or damaged, leaking occurs. Pipes can be damaged by freezing temperatures, impact from falling objects, or general corrosion from extended use.
2. Clogged Vents
When a vent pipe is clogged with debris, it can cause pressure to build up, leading to leaks.
3. Roof Damage
Roof damage can cause leaks to occur in the vent pipes. Heavy storms, tree limbs, and general wear and tear can all cause damage to roof vents.
How to Fix a Leaking Plumbing Vent Pipe
Fixing a leaking plumbing vent pipe can be a bit challenging. Nonetheless, several solutions can be used to fix the problem. Here are some useful tips to fix the problem:
1. Inspect the Pipes
Conduct a visual inspection of the pipes to check for cracks, holes, or other damage. If the pipes are damaged, replace them with new ones.
2. Clear the Clogged Vents
To fix a leaking plumbing vent pipe caused by clogging, clear the vents. You can use a plumbing snake or compressed air to remove the obstruction from the pipes.
3. Repair Roof Damage
To fix leaks caused by roof damage, you need to address the underlying problem. If it is severe, you may need to call in a professional.
A leaking plumbing vent pipe can cause significant damage if not fixed promptly. We hope this article has provided some useful insights into how to identify the causes of a leaking plumbing vent pipe and how to fix the problem. Remember, when in doubt, call a professional plumber to help you with your plumbing problems!
Vent Pipe Gasket: What You Need to Know
If you’ve been experiencing a leak in your plumbing vent pipe, one possible culprit could be a faulty vent pipe gasket. This small but crucial component is responsible for sealing the connection between the vent pipe and the roof flashing, preventing any water or debris from penetrating the roof.
Understanding Vent Pipe Gaskets
Vent pipe gaskets are typically made from rubber or silicone and come in a range of shapes and sizes to fit different vent pipe diameters. They may be round, square, or rectangular, depending on the shape of the vent pipe.
Signs of a Faulty Vent Pipe Gasket
If you suspect that your plumbing vent pipe is leaking, it’s important to inspect the vent pipe gasket for any signs of wear or damage. Some common signs of a faulty vent pipe gasket include:
- Visible cracks or tears
- Signs of decay or corrosion
- Water stains or mold on the ceiling below the vent pipe
- Strong odors coming from the vent pipe
If you notice any of these signs, it’s important to replace the vent pipe gasket as soon as possible to prevent any further damage or leaks.
Replacing a Vent Pipe Gasket
Replacing a vent pipe gasket is a relatively simple process that can be done without the help of a professional plumber. Here are the basic steps involved:
- Locate the vent pipe on your roof and remove the surrounding shingles or flashing as necessary to access the vent pipe gasket.
- Carefully remove the old vent pipe gasket, taking care not to damage the vent pipe itself.
- Clean the surrounding area and the vent pipe with a solution of water and mild detergent.
- Install the new vent pipe gasket, making sure that it is centered and snugly fitted around the vent pipe.
- Replace the shingles or flashing around the vent pipe to complete the repair.
While a leaking plumbing vent pipe can be frustrating and potentially damaging to your home, a faulty vent pipe gasket is a common culprit that can be easily replaced. By understanding how vent pipe gaskets work and how to identify signs of wear or damage, you can take proactive steps to keep your plumbing system running smoothly and prevent any leaks from occurring.
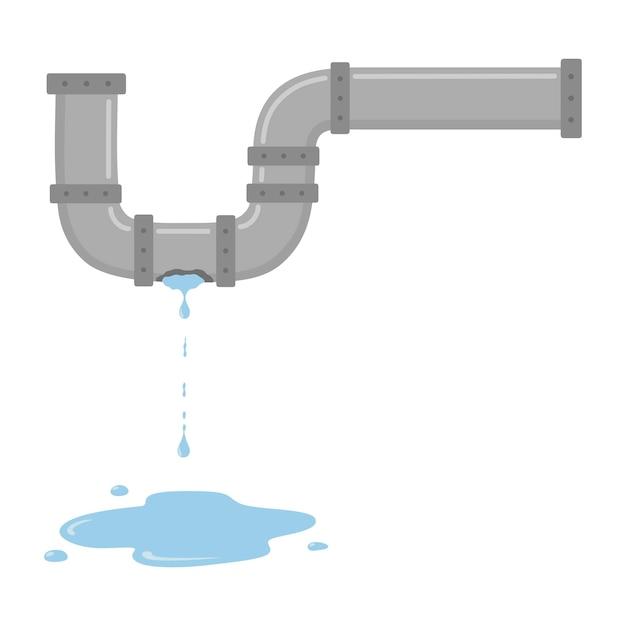
Plumbing Vent Stack Leak
Plumbing vent stacks are vertical pipes that allow air to flow from the plumbing system out through the roof. They work hand in hand with the plumbing drain pipes to ensure a well-functioning plumbing system. However, leakages on these pipes are a common problem in every household, and it is essential to address them to avoid further damage.
Signs of plumbing vent stack leaks
Detecting a plumbing vent stack leak can be a challenge, but here are some signs that might help you identify a leak:
- Damp marks on the ceiling: This can indicate that water is seeping through the vent stack and pooling on the ceiling.
- Musty smell: The accumulation of stagnant water in the pipes can produce a wet, musty smell.
- Visible water dripping: This is an obvious sign of a leak, and it might appear when the roof is wet or after rainfall.
- Slow drainage: If your drains take time to empty, it can be a result of obstructed vent pipes, leading to slow drainage.
Causes of plumbing vent stack leaks
Various reasons can cause plumbing vent stack leaks. Some of them include:
- Age: Over time, pipes become older and more prone to damage, leading to leaks.
- Wear and tear: The pipes can undergo wear and tear due to harsh weather conditions, leading to cracks and holes.
- Improper installation: When the pipes have not been installed correctly, they tend to shift, crack, or break, leading to leaks.
### How to address plumbing vent stack leaks
Addressing plumbing vent stack leaks is crucial and needs to be done by a qualified plumber. Here are some steps the plumber might follow:
- Identify the source of the leak: It is essential to locate the leak before repairing it.
- Cut open the roof: The plumber will have to remove the shingles to locate the damaged portion of the pipe.
- Replace the pipe or patch up the hole: Depending on the extent of the damage, the plumber will replace the damaged pipe or patch up the hole.
### Conclusion
In conclusion, a leaking plumbing vent stack can cause significant damage to your plumbing system and house if not detected and repaired immediately. Whenever you notice any of the signs mentioned above, it is essential to call a qualified plumber to repair the leak.
Pipe on Roof Leaking Water
If you’ve noticed water stains on your ceiling or walls, there’s a chance that your plumbing vent pipe on your roof may be leaking. This is often a result of the pipe not being sealed correctly or due to wear and tear over time. If you want to fix this problem, you’ll need a few tools and basic plumbing knowledge.
Step 1: Identify the Problem
The first thing you’ll need to do is locate the source of the problem. This can be done easily by checking your attic or crawlspace for any sign of water. If you’re lucky, you’ll be able to see where the water is coming from and take the necessary steps to fix it.
Step 2: Inspect the Pipe
Once you have identified the problem, you need to inspect the plumbing vent pipe. The pipe could be blocked, damaged, or corroded. This inspection should also include the flashing around the pipe. If the pipe is in good condition, check the flashing.
Step 3: Repair the Pipe
If you notice any cracks or damage on the pipe or flashing, there are a few ways you can fix it. For small cracks, you can use silicone caulk to seal it. For more extensive damage, you may need to replace the damaged section of the pipe or flashing. A plumber can help you with this if you’re not confident in fixing it yourself.
Step 4: Regular Maintenance
To prevent further leaks, it is essential to do some regular maintenance on your plumbing vent pipe. Clean the pipe regularly to prevent any blockages, and ensure that it is correctly sealed. Also, check the surrounding area for any debris that may affect the pipe’s proper function.
Fixing a plumbing vent pipe on your roof might be a daunting task, but it’s something that needs to be done to prevent further damage to your home. If you’re not confident in fixing it, you should seek the help of a professional plumber. Regular maintenance and inspection can also help minimize future problems.
Bathroom Roof Vent Leaking
If you’ve noticed water stains on the bathroom ceiling or dripping from the exhaust fan, your bathroom roof vent might be leaking. This common problem can cause serious damage to your home if left unchecked. Here’s what you need to know:
Causes of Bathroom Roof Vent Leaks
A bathroom roof vent can leak for several reasons. It could be due to a damaged or malfunctioning vent hood, cracked vent pipe, or poor installation. Roof vents can also get clogged with debris, leaves, or bird nests, causing water to back up and leak into your attic or ceiling.
Signs of Bathroom Roof Vent Leaks
The first sign of a bathroom roof vent leak is usually water stains or mold on the ceiling. You might also hear dripping sounds or notice a musty odor. If left untreated, the leak can cause the ceiling to sag or even collapse.
Fixing Bathroom Roof Vent Leaks
Fixing a leaking bathroom roof vent involves locating the source of the leak and repairing it. This can be a tricky and dangerous process, requiring climbing onto the roof and working with delicate plumbing parts. It’s best to hire a professional plumber or roofing contractor to handle the repair.
Preventing Bathroom Roof Vent Leaks
Preventing bathroom roof vent leaks involves proper installation and regular maintenance. Make sure your vent hood is properly installed and functioning correctly. Clear out any debris or obstructions from the vent regularly, and inspect the vent and surrounding areas for signs of damage or wear and tear.
In conclusion, a leaking bathroom roof vent is a common plumbing issue that can cause serious damage to your home if ignored. If you suspect a leak, don’t hesitate to call a professional plumber or roofing contractor for help. With proper maintenance and attention, you can prevent leaks and prolong the life of your bathroom roof vent.
Plumbing Vent Pipe Collar Leaks
If you find water stains on your ceiling, it might be a sign that your plumbing vent pipe collar is leaking. The plumbing vent pipe collar is the rubber seal around the pipe that prevents water from seeping through the roof. In this section, we’ll explore how to fix a leaking plumbing vent pipe collar.
Inspecting the Collar
Before attempting any repairs, you must first inspect the collar to determine the extent of the damage. Look for cracks, tears, or signs of wear and tear. If the collar is damaged beyond repair, you’ll need to replace it. But if it’s just a minor leak, you can fix it with some quick DIY repair.
Repairing a Leaky Collar
To repair the leaking plumbing vent pipe collar, you’ll need the following tools:
- A Flathead Screwdriver
- A Caulking Gun
- A Tube of Silicone Sealant
First, use the flathead screwdriver to remove the collar from around the pipe. Clean the pipe surface and the inside of the collar with a cloth. Apply the silicone sealant around the collar’s circumference, ensuring that it’s evenly spread. Reinstall the collar, pressing it firmly onto the pipe, and tighten the screw securely. Leave the silicone sealant to dry for at least 24 hours.
When to Seek Professional Help
While you can fix a minor leak yourself, you may need professional help for significant leaks. Severe water damage, mold growth, or persistent leaks despite several DIY attempts might require the expertise of a plumber.
A leaking plumbing vent pipe collar can cause significant water damage to your ceiling and home if left unrepaired. By inspecting and repairing the collar, you can prevent costly repairs and keep your home safe from water damage.
Roof Vent Leak Repair from Inside
Roof vent leaks can be a headache for homeowners. It can cause severe damage to the roof and the ceiling, leading to costly repairs. Leaks can happen due to various reasons, including poor installation, age, or damage caused by weather. As soon as you notice a leak, it is essential to get it fixed immediately to prevent further damage.
Identify the Cause of the Leak
Before you start repairing your roof vent leak from inside, you must identify the cause of the leak. The easiest way to detect the leak is to look for water stains on the ceiling. If you can’t find the source of the leak, call a professional plumber.
Gather the Tools and Materials
To repair the leak, you will need a few tools and materials. You will need a ladder, roofing cement, roofing tape, caulking gun, and a putty knife to get started. Make sure the tools and materials you use are of high quality to ensure long-lasting repairs.
Repair the Leak
First, remove any debris or dirt around the leaking area. Using a putty knife, remove the old roofing cement and roofing tape around the leak. Once you have removed the old roofing materials, apply a fresh layer of roofing cement around the vent pipe. Make sure to apply a thick layer to cover any potential gaps. Then, apply a layer of roofing tape on top of the roofing cement to reinforce it.
Check for Any Further Leaks
Once you have completed the repair, it’s time to check whether there are any further leaks. Turn on your hose and spray water around the repaired area for a few minutes. Check the underside of the roof for any signs of water leaking. If you notice any leakage, remove the old roofing tape and apply a fresh coat of roofing cement and roofing tape.
In conclusion, repairing a roof vent leak from inside is not a difficult task if you have the right tools and materials. However, if you’re not comfortable working on your roof, it’s always best to call a professional plumber. Remember, addressing the issue immediately can save you from a more significant headache and costly repairs later.
How to fix a leaking vent pipe
If you’re experiencing a leaking vent pipe, you’re not alone. It is a common plumbing problem that can cause significant damage if left unattended. Here’s a step-by-step guide on how to fix a leaking vent pipe:
Step 1: Locate the leak
The first step to fixing a leaking vent pipe is to locate the leak. Check for water stains or damage around the vent pipe. Once you’ve located the leak, use a marker to mark the area for easy identification.
Step 2: Turn off the water supply
Before you start fixing the leak, turn off the water supply to the affected area. This is to prevent any water from further damaging your property.
Step 3: Clean the affected area
Clean the affected area to remove any debris or dirt using a brush or a rag. This will help you see the extent of the leak.
Step 4: Apply sealant
Using a sealant or a silicone caulk, apply a thick coat around the marked area. This will effectively seal the leak and prevent any water from seeping through. Ensure that the sealant covers both sides of the vent pipe.
Step 5: Let the sealant dry
Allow the sealant to dry completely before turning on the water supply. This will give enough time for the sealant to settle and harden, effectively sealing the leak.
Step 6: Turn on the water supply
Once the sealant has dried, turn on the water supply to the affected area and check for any leaks. If there is no leak, you’ve successfully fixed your vent pipe.
Fixing a leaking vent pipe is not rocket science, but it requires patience and attention to detail. If you’re not confident in fixing it yourself, it’s always best to seek the help of a professional plumber. In the end, it’s better to spend a little money now to fix the problem than to deal with significant water damage later on.
How to Fix a Leaking Plumbing Stack
Plumbing stack leaks can be a nightmare, causing water damage to your home if not fixed timely. However, with the right tools and basic plumbing knowledge, you can fix a small leak on your own. Here are some simple steps you can follow in fixing a leaking plumbing stack.
Step 1: Inspect the Pipes
The first step is to inspect the pipes to determine the source of the leak. Check the plumbing stack for any signs of dripping water or water stains. Once you’ve spotted the leak, inspect the area around it to check the extent of the damage.
Step 2: Turn off the Water Supply
Before you start fixing the leak, turn off the water supply to avoid any further damage. Locate the main shut-off valve in your home, and turn it off to stop the water from flowing.
Step 3: Repair the Leak
Once you have turned off the main water supply, it’s time to repair the leak. Apply a sealant to the leaking area using a putty knife or a waterproof tape to seal the hole. You can also use a pipe clamp to stop the leak if the hole is big.
Step 4: Test the Repair
After you have repaired the leak, turn on the water supply to check if the fix worked. Otherwise, repeat the process and ensure that the repair is tight enough.
Step 5: Call a Professional
If the above steps didn’t work or you’re not comfortable with handling the task on your own, contact a professional plumber to fix the issue. Hiring a professional plumber is not only safe but also saves you the frustration of trying to figure out the source of the leak.
In conclusion, fixing a leaking plumbing stack may seem intimidating, but it’s manageable with the right tools and knowledge. Following the above steps can help you repair a small leak. However, for significant leaks, it’s always best to call a professional.
Plumbing Vent Pipe Leaking in Attic
Plumbing vent pipes can fail or leak, and it’s not uncommon for homeowners to overlook them. A leaking plumbing vent pipe in the attic can be a serious issue and lead to bigger problems in your house. Here’s what you should know:
Signs of a Leaking Plumbing Vent Pipe in Attic
The first sign of a leaking plumbing vent pipe in the attic is often watermarks or discoloration on the ceiling. You may also notice a musty smell, dampness or standing water in the attic. Inspect the plumbing vent pipe for any physical damage or cracks if you suspect that it’s the cause of the leak.
Causes of a Leaking Plumbing Vent Pipe in Attic
The most common cause of a leaking plumbing vent pipe in the attic is damage. Over time, the vent pipe may break, crack, or suffer damage during roof repair. Another cause of a leaking plumbing vent pipe is blocked vent pipes. When the vent pipe is blocked, water can’t escape the pipes, and it comes out through the joints or seams.
How to Fix a Leaking Plumbing Vent Pipe in Attic
Fixing a leaking plumbing vent pipe in the attic may require some DIY skills or the help of a professional roofer. If it’s a small crack that’s causing the leak, you can try to fix it by applying a waterproof sealant or tape. However, if the damage is too significant, you’ll need to replace the plumbing vent pipe.
Preventing a Leaking Plumbing Vent Pipe in Attic
The best way to prevent a leaking plumbing vent pipe in the attic is through regular maintenance. Check the roof and attic for any signs of damage, and remove debris, such as leaves and twigs, from the roof and gutters. Also, make sure that the plumbing vent pipes are not blocked with debris or ice during winter.
A leaking plumbing vent pipe in the attic can be a serious issue that requires immediate attention. Regular maintenance and inspection will help you catch any potential issues early and avoid costly repairs. If you’re not comfortable checking for damage or repairing the vent pipe yourself, consider contacting a plumber or roofer for assistance.
Why Would a Plumbing Vent Pipe Leak
If you notice water dripping from your plumbing vent pipe, for sure, you’re wondering why it’s happening. Plumbing vent pipes are essential in any plumbing system because they release gases, allowing wastewater to flow freely through your pipes. They go through the roof and are connected to the main drain line to prevent clogging and sewage backup.
Here are some reasons why your plumbing vent pipe is leaking:
Clogged Vent Pipe
The vent pipe can become clogged with debris, leading to blockage that prevents gases from escaping. When this happens, air can’t flow in or out, causing water to linger in the drainpipes and eventually create negative pressure that pulls water through the air vents. To avoid this, ensure to clean your vent pipes regularly.
Debris
Your plumbing vent pipe can get clogged by extensive waste or debris. Clogs can also form if there are trees, leaves, or other natural debris that are close to your vent pipes. It’s essential to keep your roof clean, free from leaves and debris, to avoid obstructions on the vent pipe.
Damage or Corrosion
Pipe damage is another reason why your plumbing vent pipe could be leaking. Pipes can wear out over time and corrode, leading to cracks and leaks. This damage can also be caused by extreme weather conditions and natural deterioration due to age.
Clogged Drain
Another cause of vent pipe leakage is a clogged drain line, which can force water back through the vent and cause leaks. If the problem persists, you need to call a professional to check the system.
Poor Installation
Incorrect installation of plumbing vent pipes can cause leaks, especially if the pipes are not correctly connected at the joints. Plumbing specialists must follow local building codes and standards to ensure proper installation.
Plumbing vent pipe leakage is a common problem in most homes, and the reasons for such leaks are numerous. To avoid leakage, it’s essential to conduct regular plumbing maintenance checks and clean your plumbing vent pipes regularly. Remember that calling a professional plumber will protect your system from further damages.
What to Use to Seal Vent Pipes on Roof
If you’re dealing with a leaking plumbing vent pipe on your roof, you need to seal it up properly to prevent any further damage. Here are some sealing materials you can try:
1. Roofing tar
Roofing tar is a waterproof material commonly used for repairing roof leaks. It’s easy to apply and is perfect for sealing vent pipes on your roof. However, this material has a strong odor that tends to linger, so make sure to apply it in a well-ventilated area if you choose this option.
2. Silicone caulking
Silicone caulking is another popular choice for sealing vent pipes on roofs. This material has excellent waterproofing properties and can withstand extreme temperatures. It’s also flexible, which means it can move with the expansion and contraction of your roof.
3. Roof sealant
Roof sealant is a rubberized material that’s perfect for sealing vent pipes on your roof. It’s easy to apply, long-lasting, and can be used on both wet and dry surfaces. You can choose between clear and colored options, depending on your preference.
4. Flex Seal
Flex Seal is a liquid rubber sealant that’s perfect for sealing vent pipes on your roof. This material is easy to apply and can fill in any gaps or cracks in your vent pipes. It’s also waterproof and can withstand extreme temperatures.
In conclusion, there are several materials you can use to seal vent pipes on your roof, and each has its own advantages. Choose the one that suits your needs and budget. Remember to follow the manufacturer’s instructions carefully to get the best results.